Getting Started
DemoMojo is a Chrome extension designed to enhance your demo presentations with intelligent overlays that display personas, chapters, and value drivers. This guide will walk you through everything you need to know to get the most out of DemoMojo.
What is DemoMojo?
DemoMojo transforms your browser into a powerful demo storytelling platform by overlaying contextual information directly onto your web pages. Whether you're presenting software demos, sales pitches, or training sessions, DemoMojo helps you maintain focus while providing your audience with relevant context.
Installation
Follow these steps to install DemoMojo on your Chrome browser:
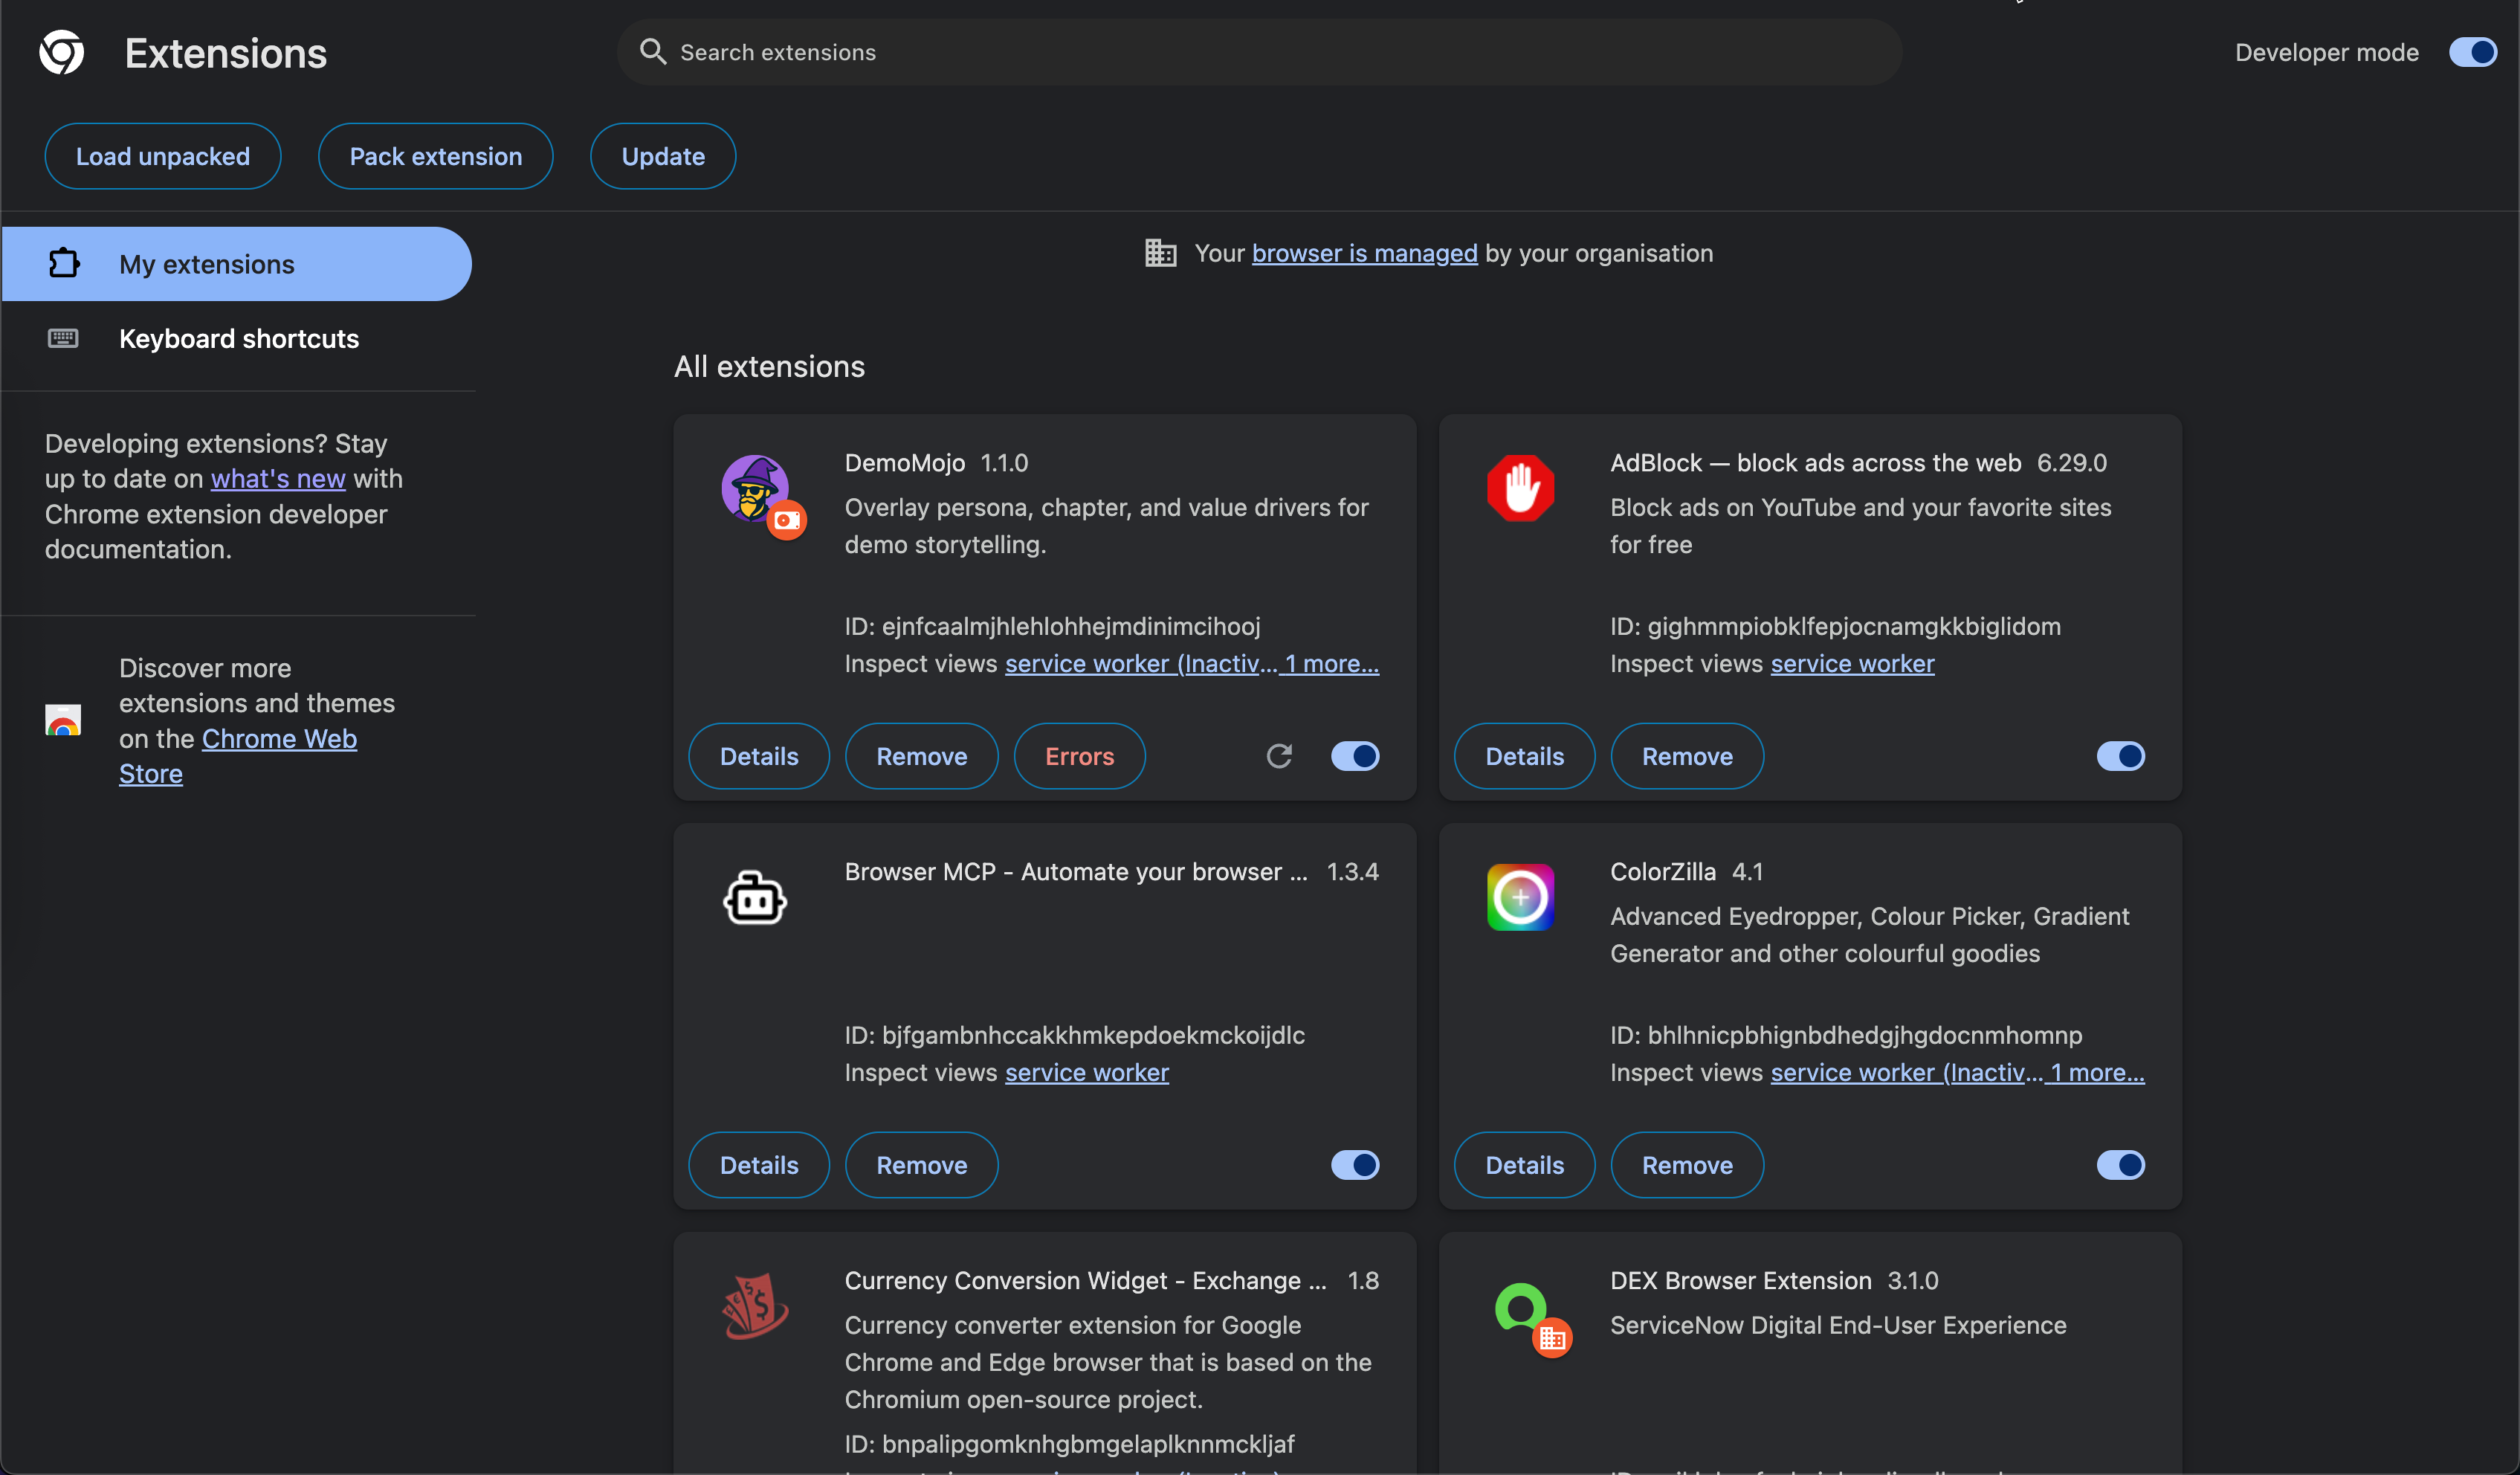
- Install from Chrome Web Store
Visit the Chrome Web Store to install DemoMojo:
- Verify Installation
The DemoMojo icon should appear in your Chrome extension toolbar.
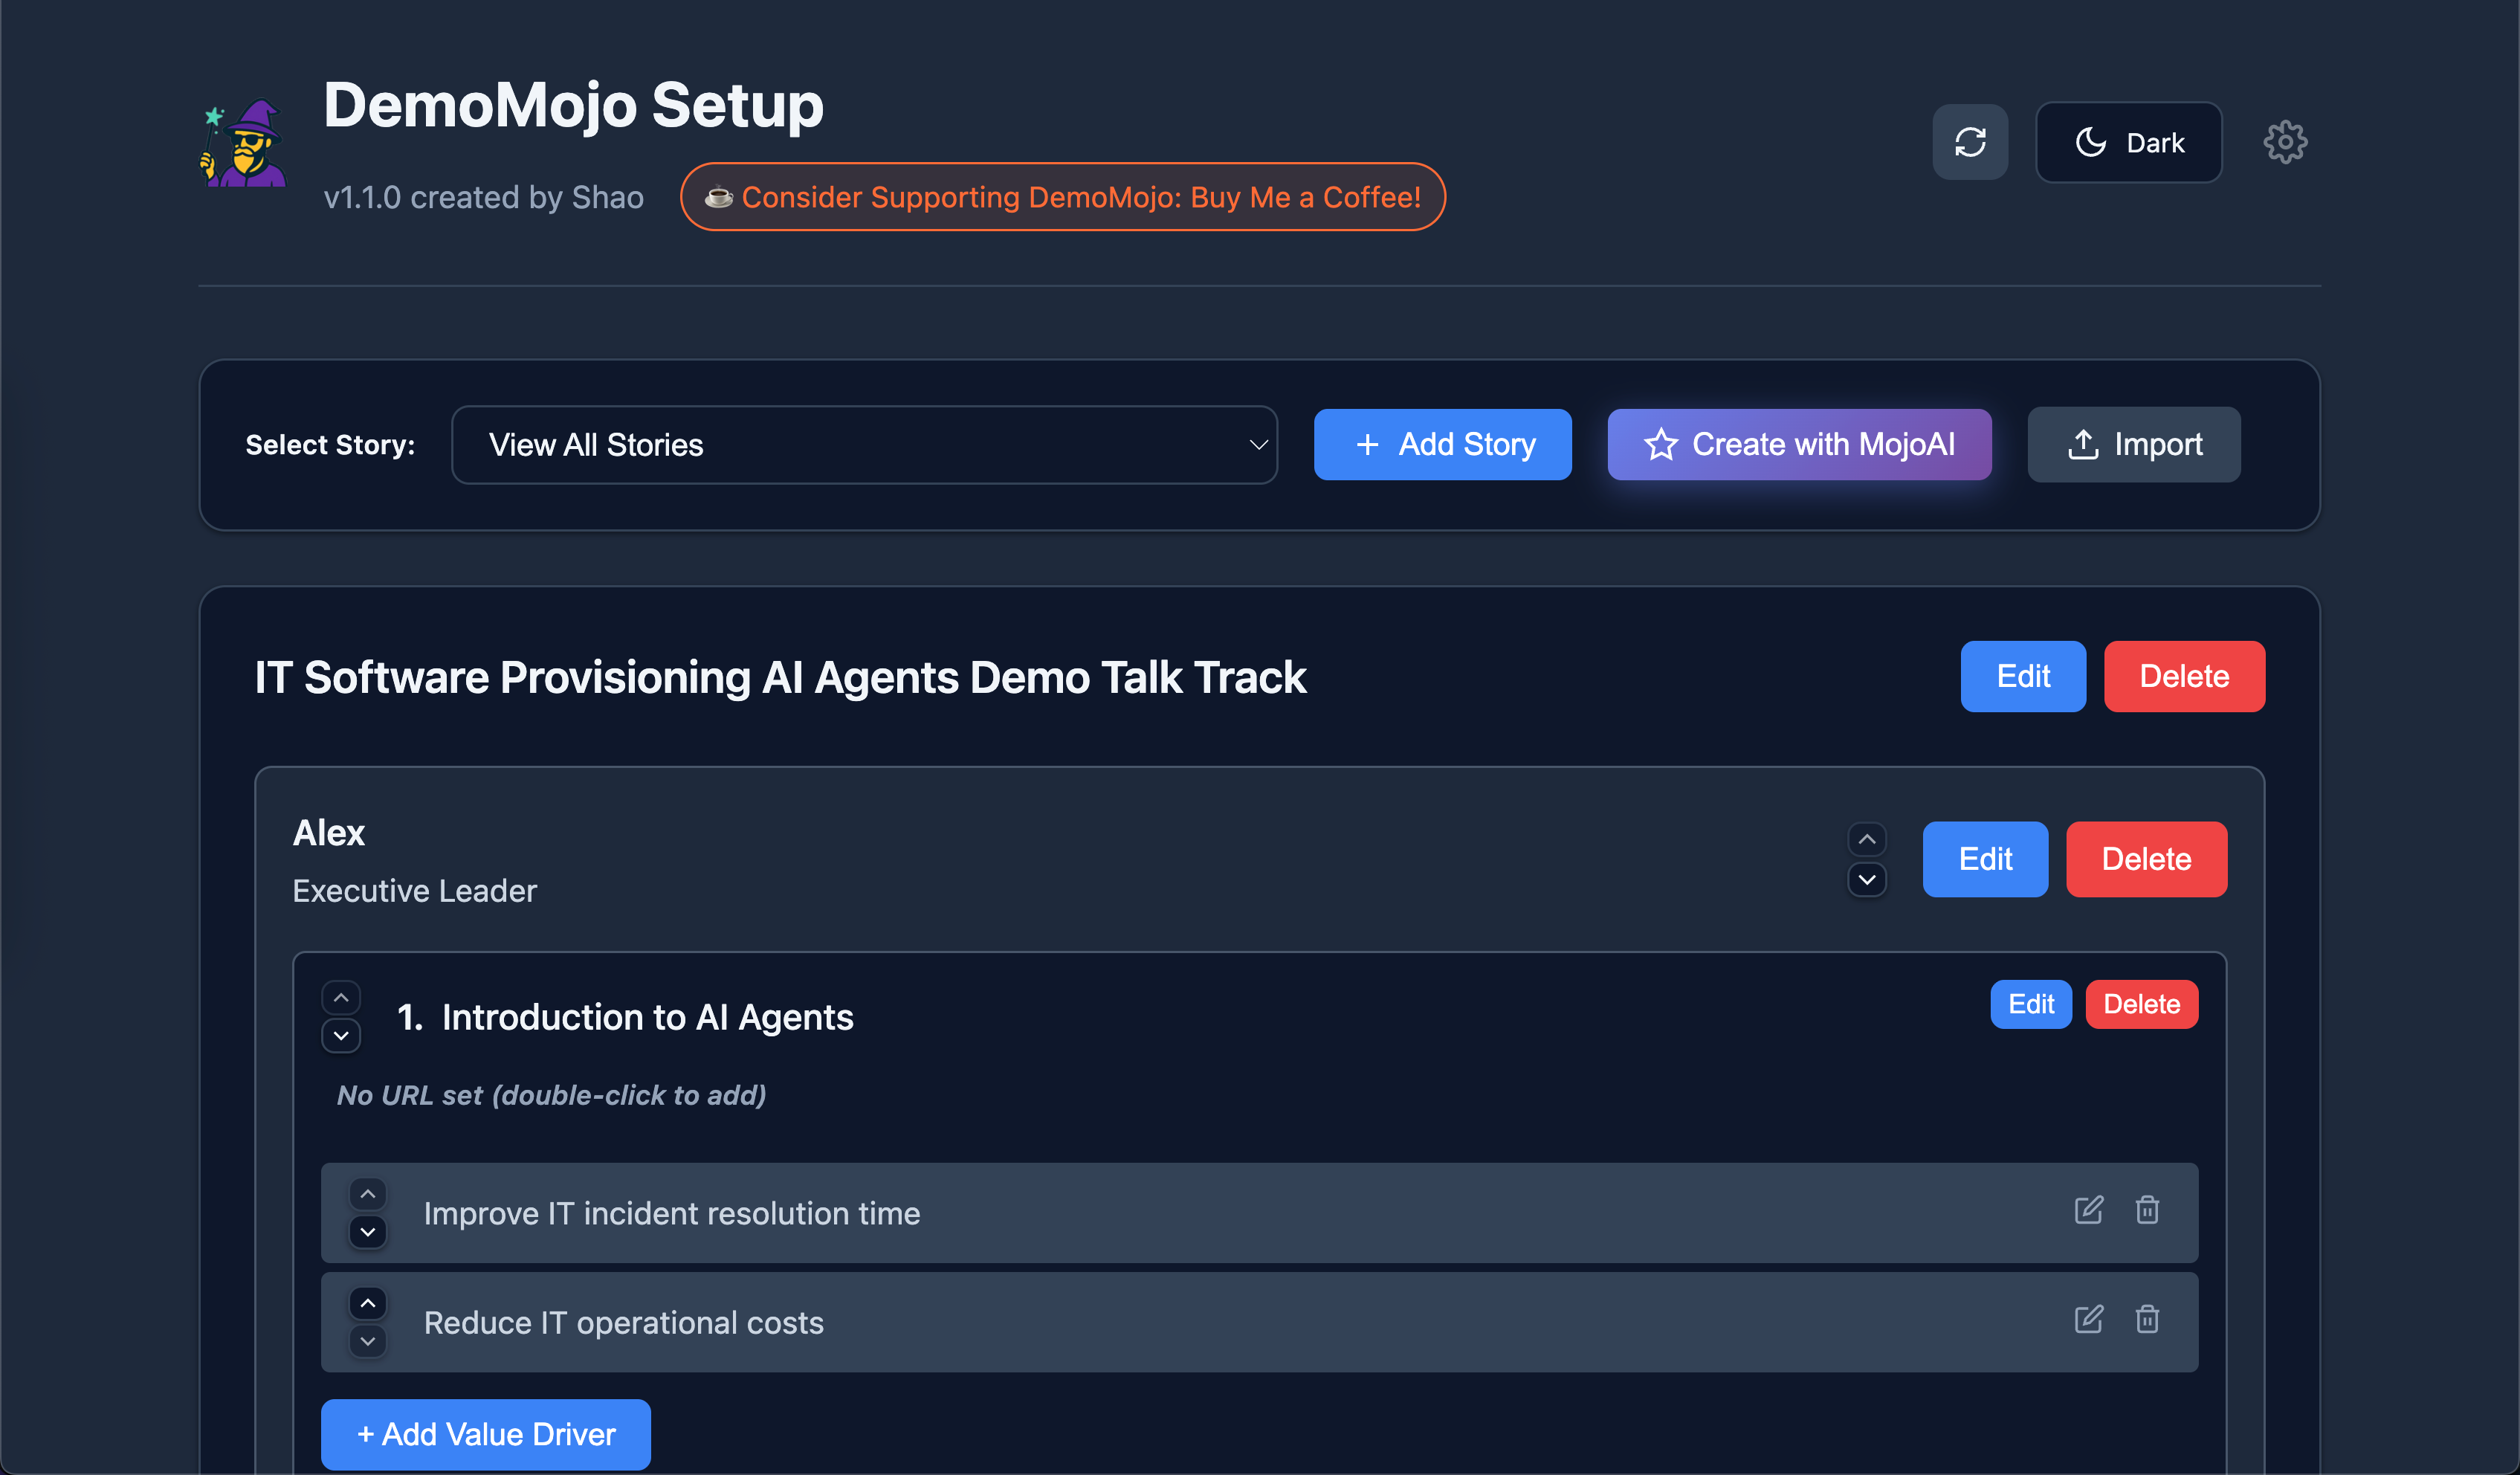
Creating Stories
Before you can use DemoMojo overlays, you need to create and configure your demo stories. Each story contains personas, chapters, and value drivers that will be displayed during your presentations.
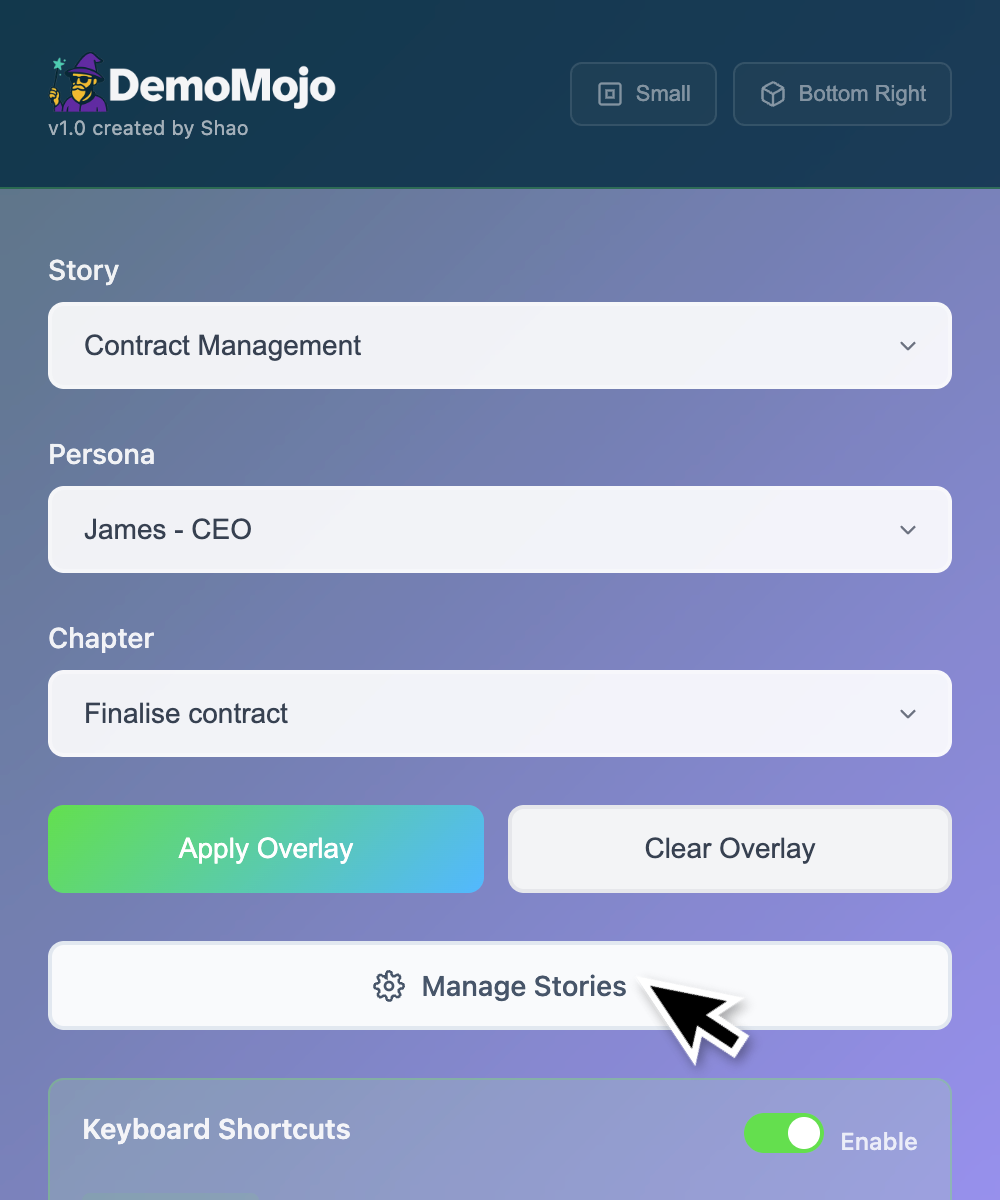
Accessing Story Management
Click the DemoMojo extension icon in your toolbar, then click "Manage Stories" to open the story setup page.
Creating a New Story Manually
- Add Story
Enter a name and description for your story. This helps you identify different demo scenarios.
- Add Personas
Create personas with names, titles, and headshot images. These represent your target audience members.
- Define Chapters
Break your demo into logical chapters with titles and descriptions. Each chapter represents a section of your presentation.
- Set Value Drivers
Add value drivers for each chapter that highlight the business benefits and outcomes.
Managing Existing Stories
You can edit, duplicate, or delete existing stories from the story management page. This allows you to maintain multiple demo scenarios for different audiences or use cases.
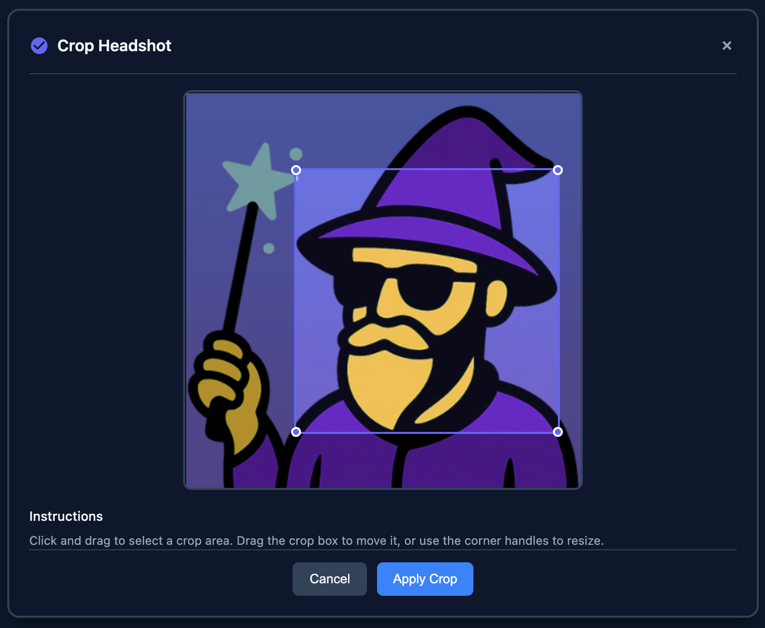
Headshot Cropping
DemoMojo includes a built-in headshot cropper that ensures all persona images are displayed in a perfect 1:1 aspect ratio. This creates a consistent, professional appearance across all personas in your stories.
How It Works
- Upload Image
When you upload a headshot image for a persona, the cropper automatically appears in the persona modal.
- Crop to 1:1 Ratio
Use the interactive crop box to select the area you want to use. The crop box maintains a 1:1 aspect ratio automatically.
- Adjust Position
Drag the crop box to reposition it, or use the corner handles to resize while maintaining the square aspect ratio.
- Save Persona
Once you've cropped the image, you can save the persona. The cropped image will be used throughout the extension.
Features
- Automatic 1:1 Aspect Ratio - Crop box automatically maintains square dimensions
- Drag to Reposition - Click and drag the crop box to move it around the image
- Corner Handles - Resize the crop box using corner handles while maintaining aspect ratio
- High-Quality Processing - Uses HTML5 Canvas API for high-quality image processing
- Required Step - Cropping is required before saving personas to ensure consistency
Best Practices
- Upload high-resolution images for best cropping results
- Position the face in the center of the crop box for optimal display
- Ensure good lighting and clear visibility of the person
- Use professional headshots when possible for a polished look
Creating Demo Stories with MojoAI
MojoAI uses artificial intelligence to automatically create structured demo stories from your existing content. You can input demo scripts or upload PDF documents to generate personas, chapters, and value drivers automatically.
Setting Up MojoAI
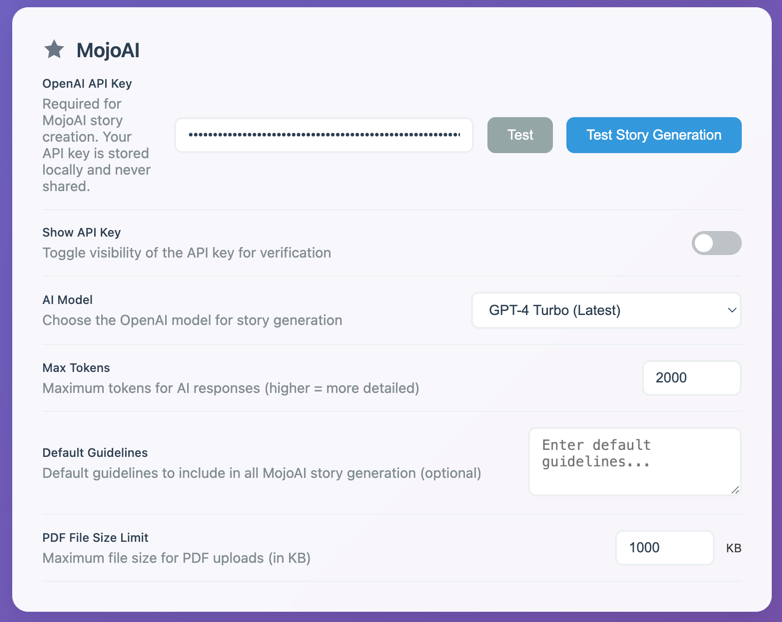
- Configure API Key
Go to Settings and add your OpenAI API key in the MojoAI section. Your API key is stored locally and never shared.
- Choose AI Model
Select from GPT-3.5 Turbo (faster, lower cost), GPT-4 (higher quality), or GPT-4 Turbo (latest) based on your needs.
- Test Configuration
Use the "Test Story Generation" button to verify your setup works correctly.
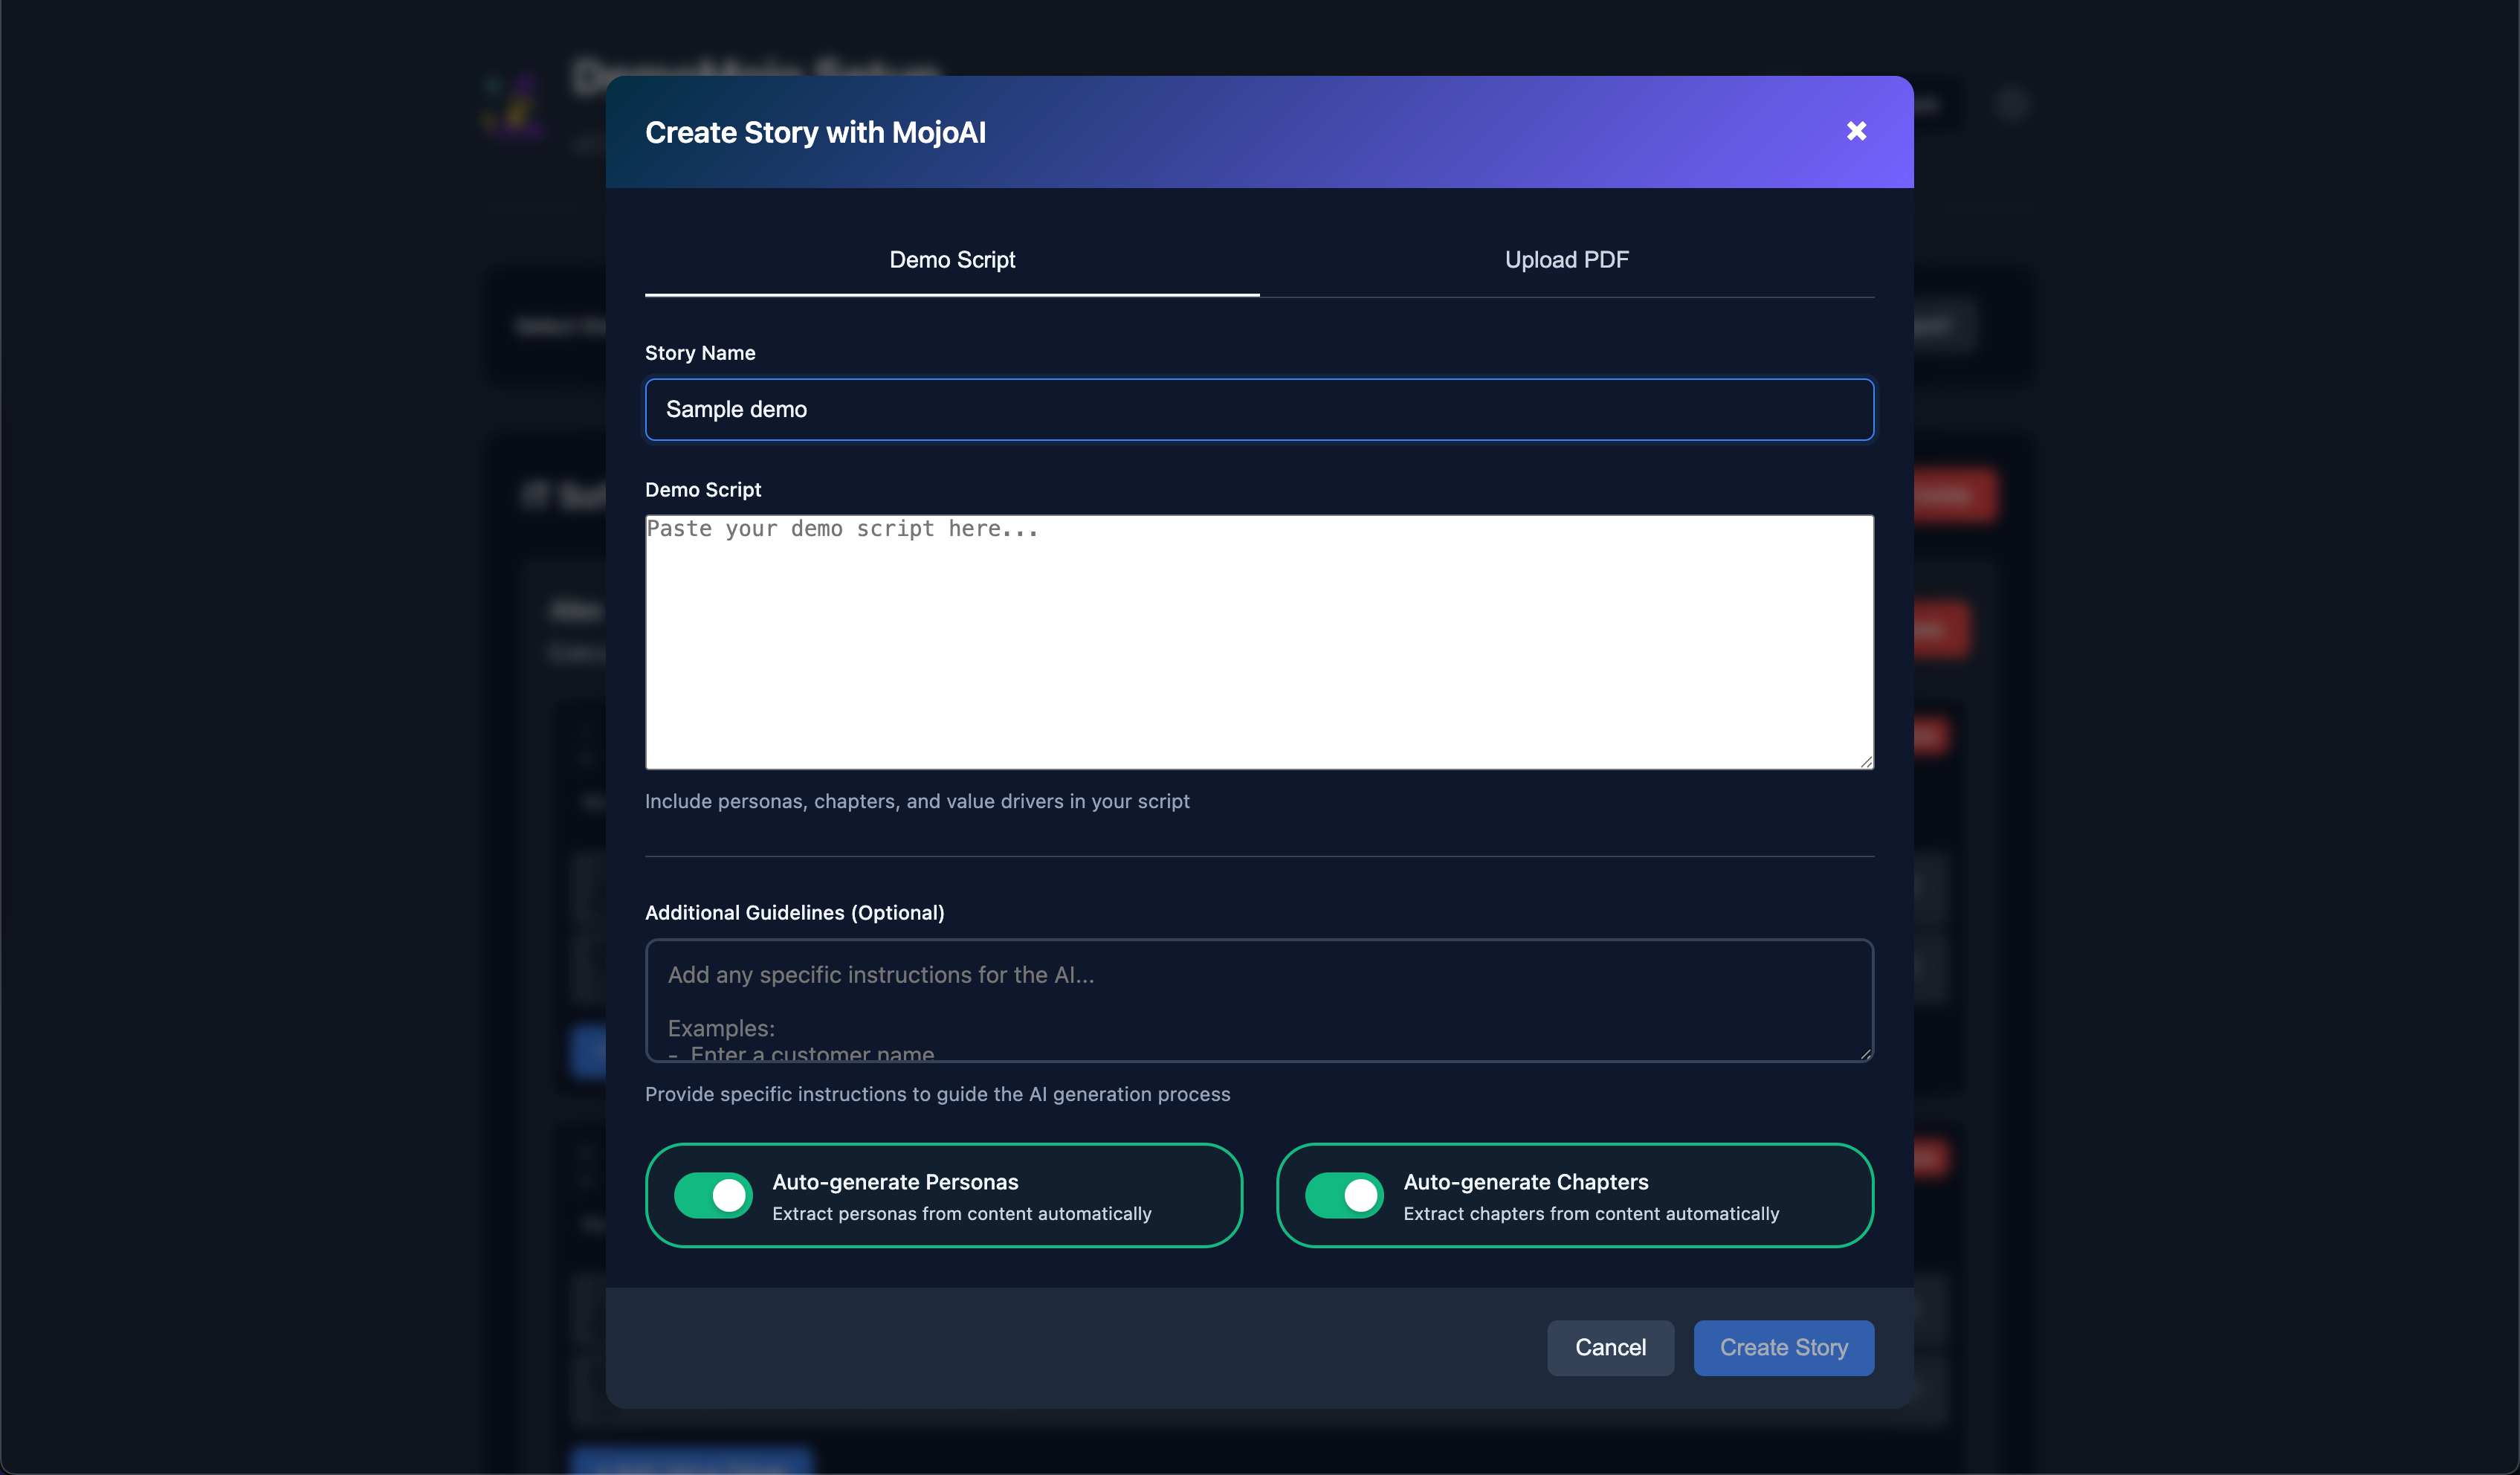
Creating Stories with Demo Scripts
- Open MojoAI Modal
Click "Create with MojoAI" in the story management page to open the AI creation interface.
- Enter Demo Script
Paste your demo script in the "Demo Script" tab. Include personas, chapters, and value drivers in your script for best results.
- Configure Generation Options
Use the additional options to customize the AI generation process:
- Additional Guidelines - Add specific instructions for the AI (e.g., "Emphasize security features", "Include ROI calculations")
- Auto-generate Personas - Toggle to automatically extract personas from your content
- Auto-generate Chapters - Toggle to automatically extract chapters from your content
- Generate Story
Click "Generate Story" and MojoAI will analyze your script to create structured personas and chapters based on your selected options.
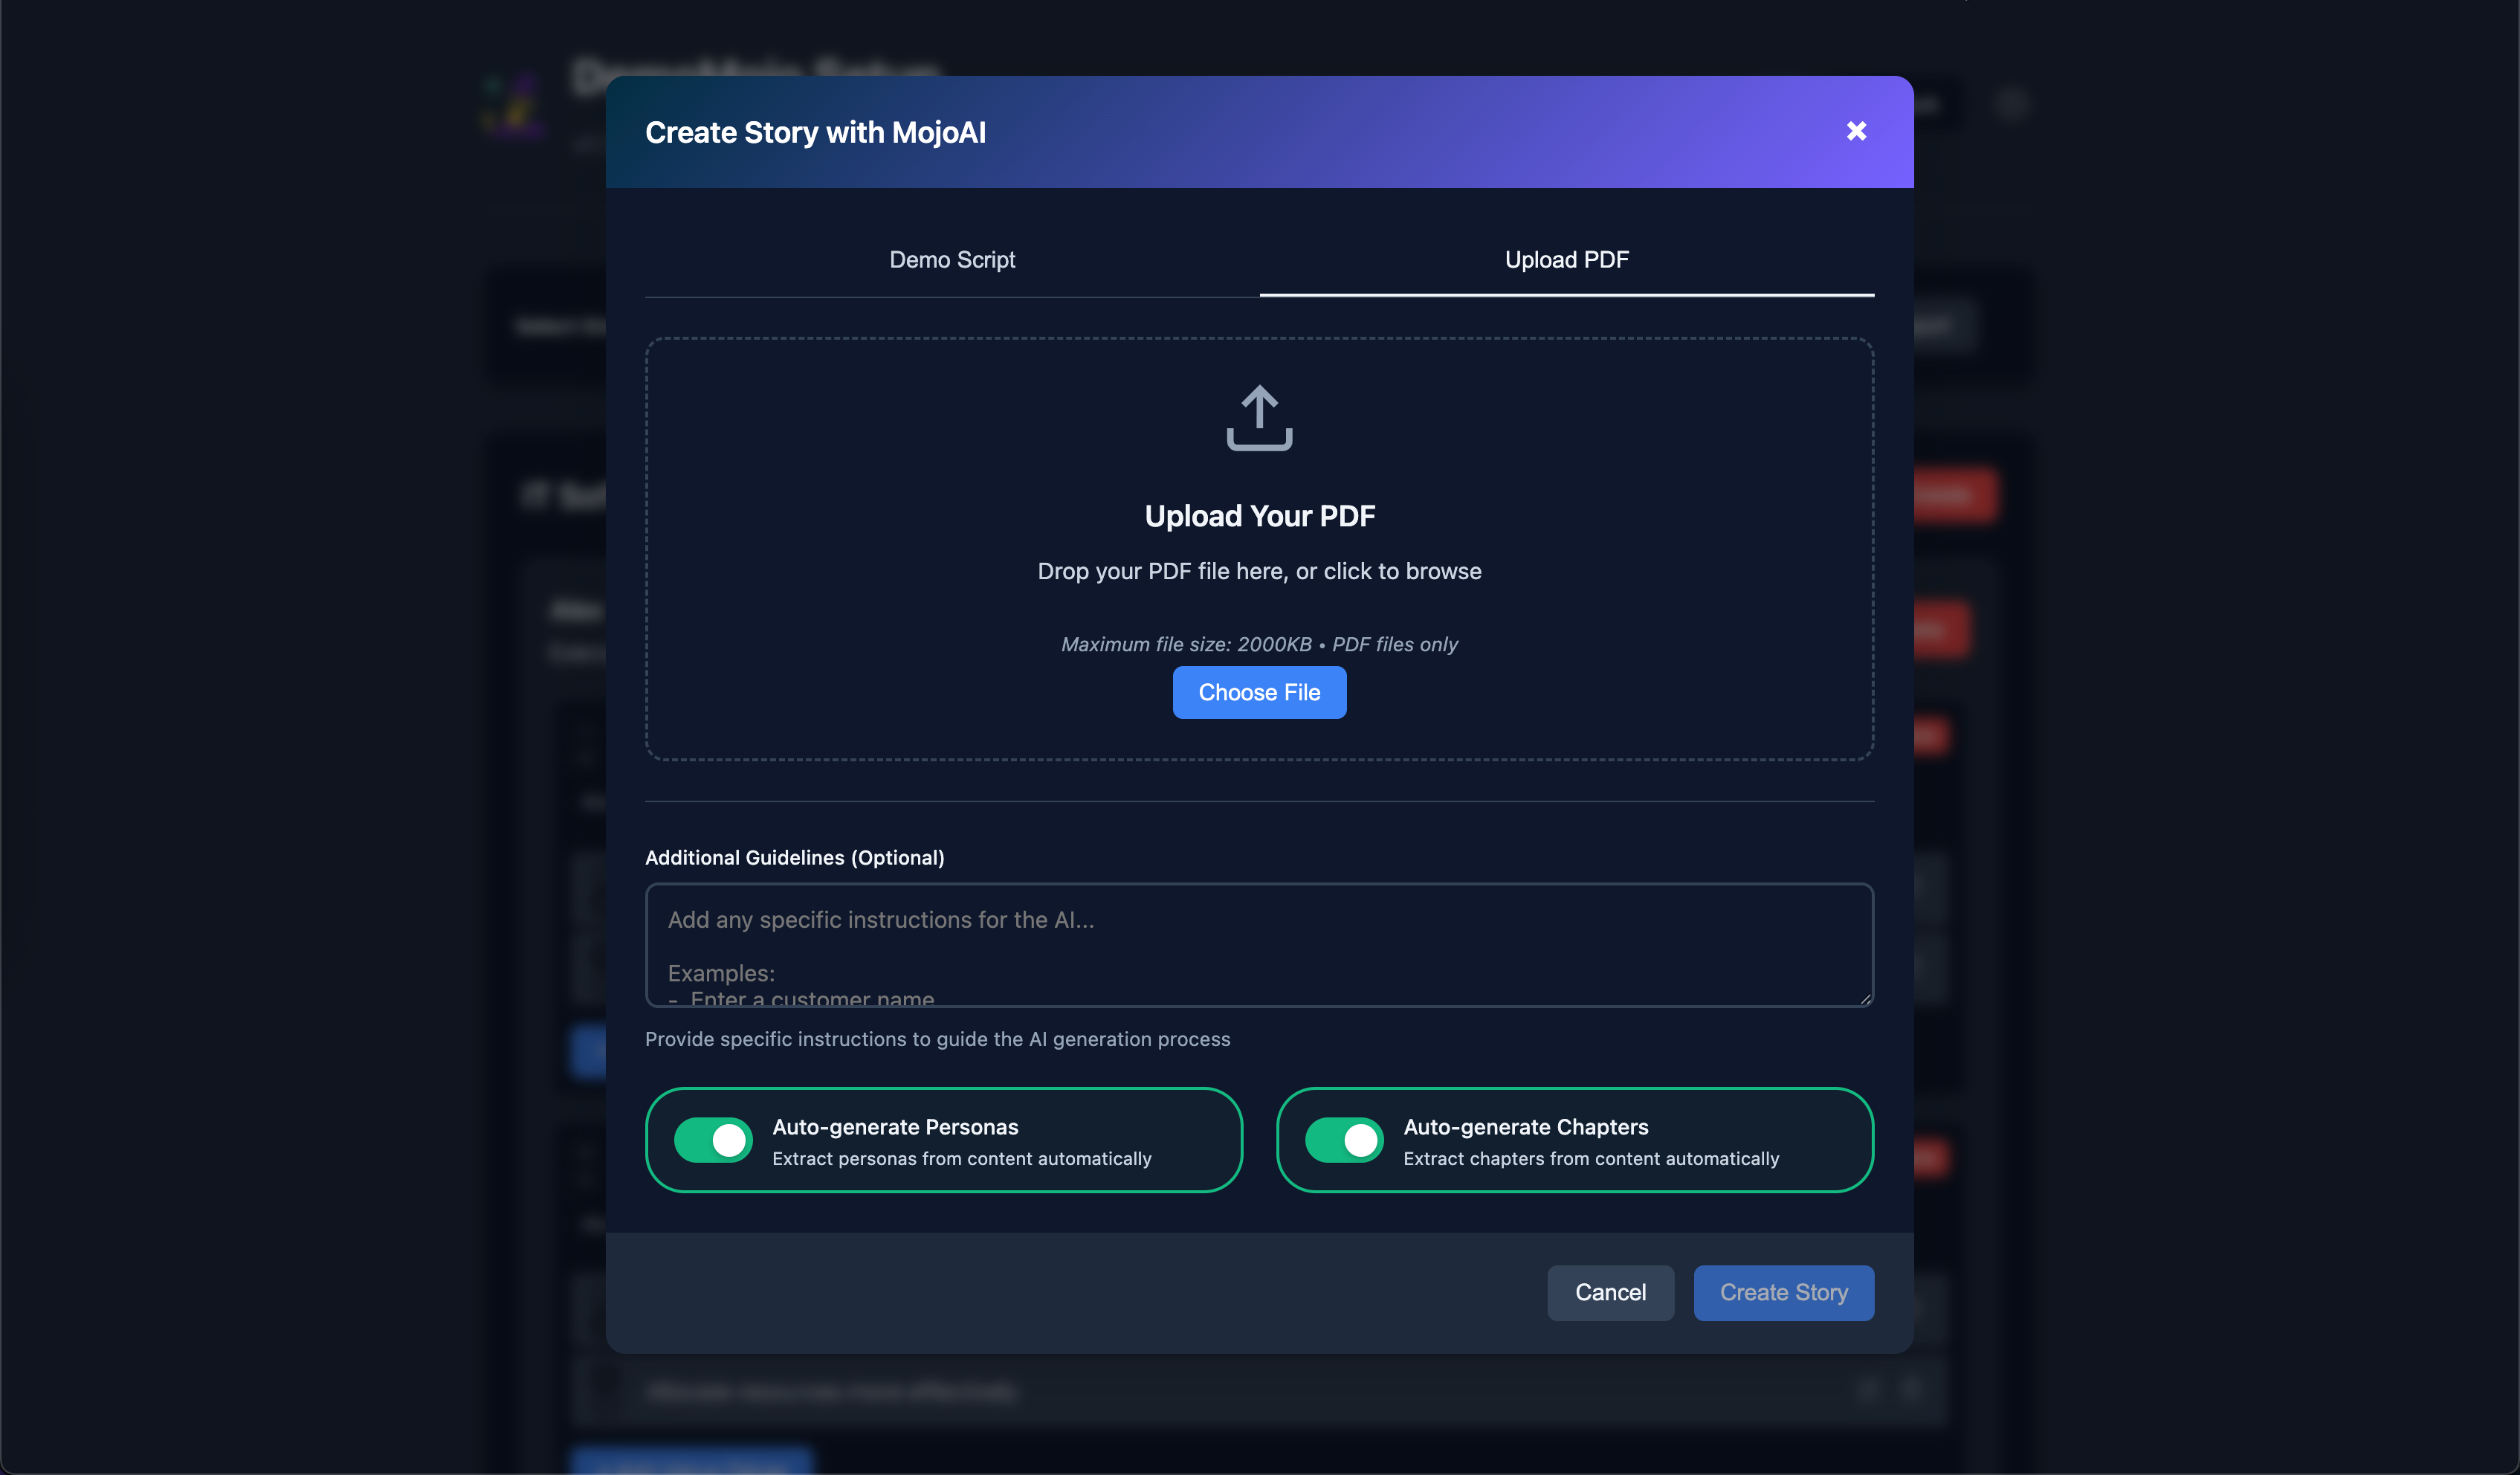
Creating Stories from PDFs (GPT-4 Turbo required)
- Upload PDF
Switch to the "Upload PDF" tab and drag & drop or select a PDF file containing your demo content.
- Configure Generation Options
Use the same additional options available for demo scripts:
- Additional Guidelines - Add specific instructions for the AI (e.g., "Emphasize security features", "Include ROI calculations")
- Auto-generate Personas - Toggle to automatically extract personas from your PDF content
- Auto-generate Chapters - Toggle to automatically extract chapters from your PDF content
- Configure File Size
Adjust the PDF file size limit in settings if needed (default: 500 KB). Larger files may take longer to process.
- Process Document
Click "Generate Story" and MojoAI will extract text from your PDF and generate a structured story with personas and chapters based on your selected options.
Best Practices for MojoAI
- Include clear persona descriptions with names and job titles
- Structure your demo script with clear chapter headings
- Include value propositions and business benefits
- Use consistent formatting for better AI understanding
- Use Additional Guidelines - Add specific instructions like "Emphasize security features" or "Include ROI calculations" to guide the AI
- Auto-generate Options - Enable both toggles for automatic extraction, or disable them if you prefer manual control
- Default Guidelines - Set up default guidelines in Settings to apply to all story generations
- Review and refine generated content as needed
Troubleshooting MojoAI
- API Key Issues - Verify your OpenAI API key is valid and has sufficient credits
- PDF Processing - Ensure PDF files are readable and within size limits
- Generation Errors - Check your demo script formatting and try simplifying the content
- Model Selection - Try different AI models if generation quality is poor
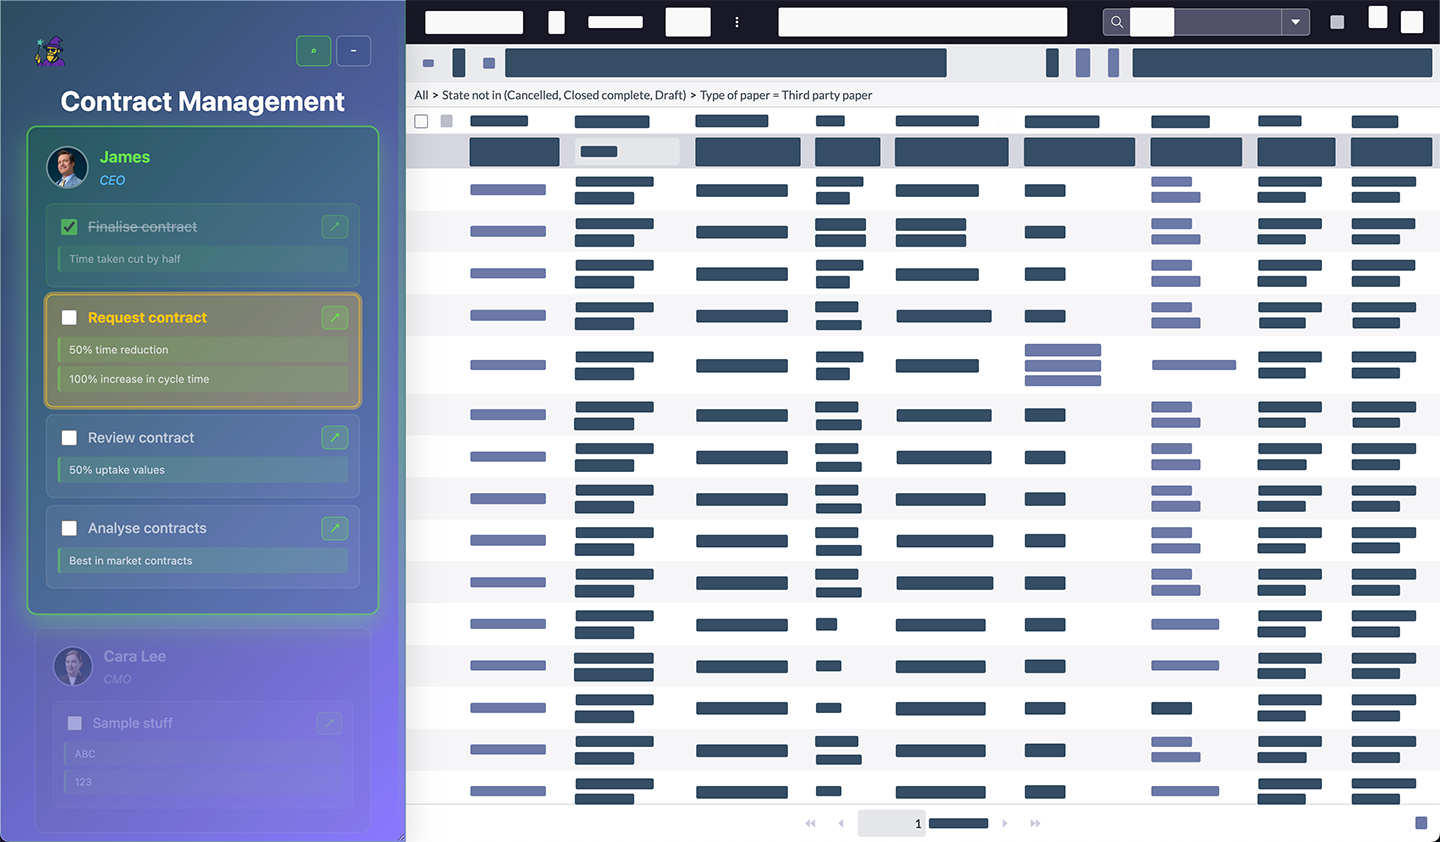
Using Overlays
Once you've created your stories, you can apply overlays to any webpage to enhance your demo presentations.
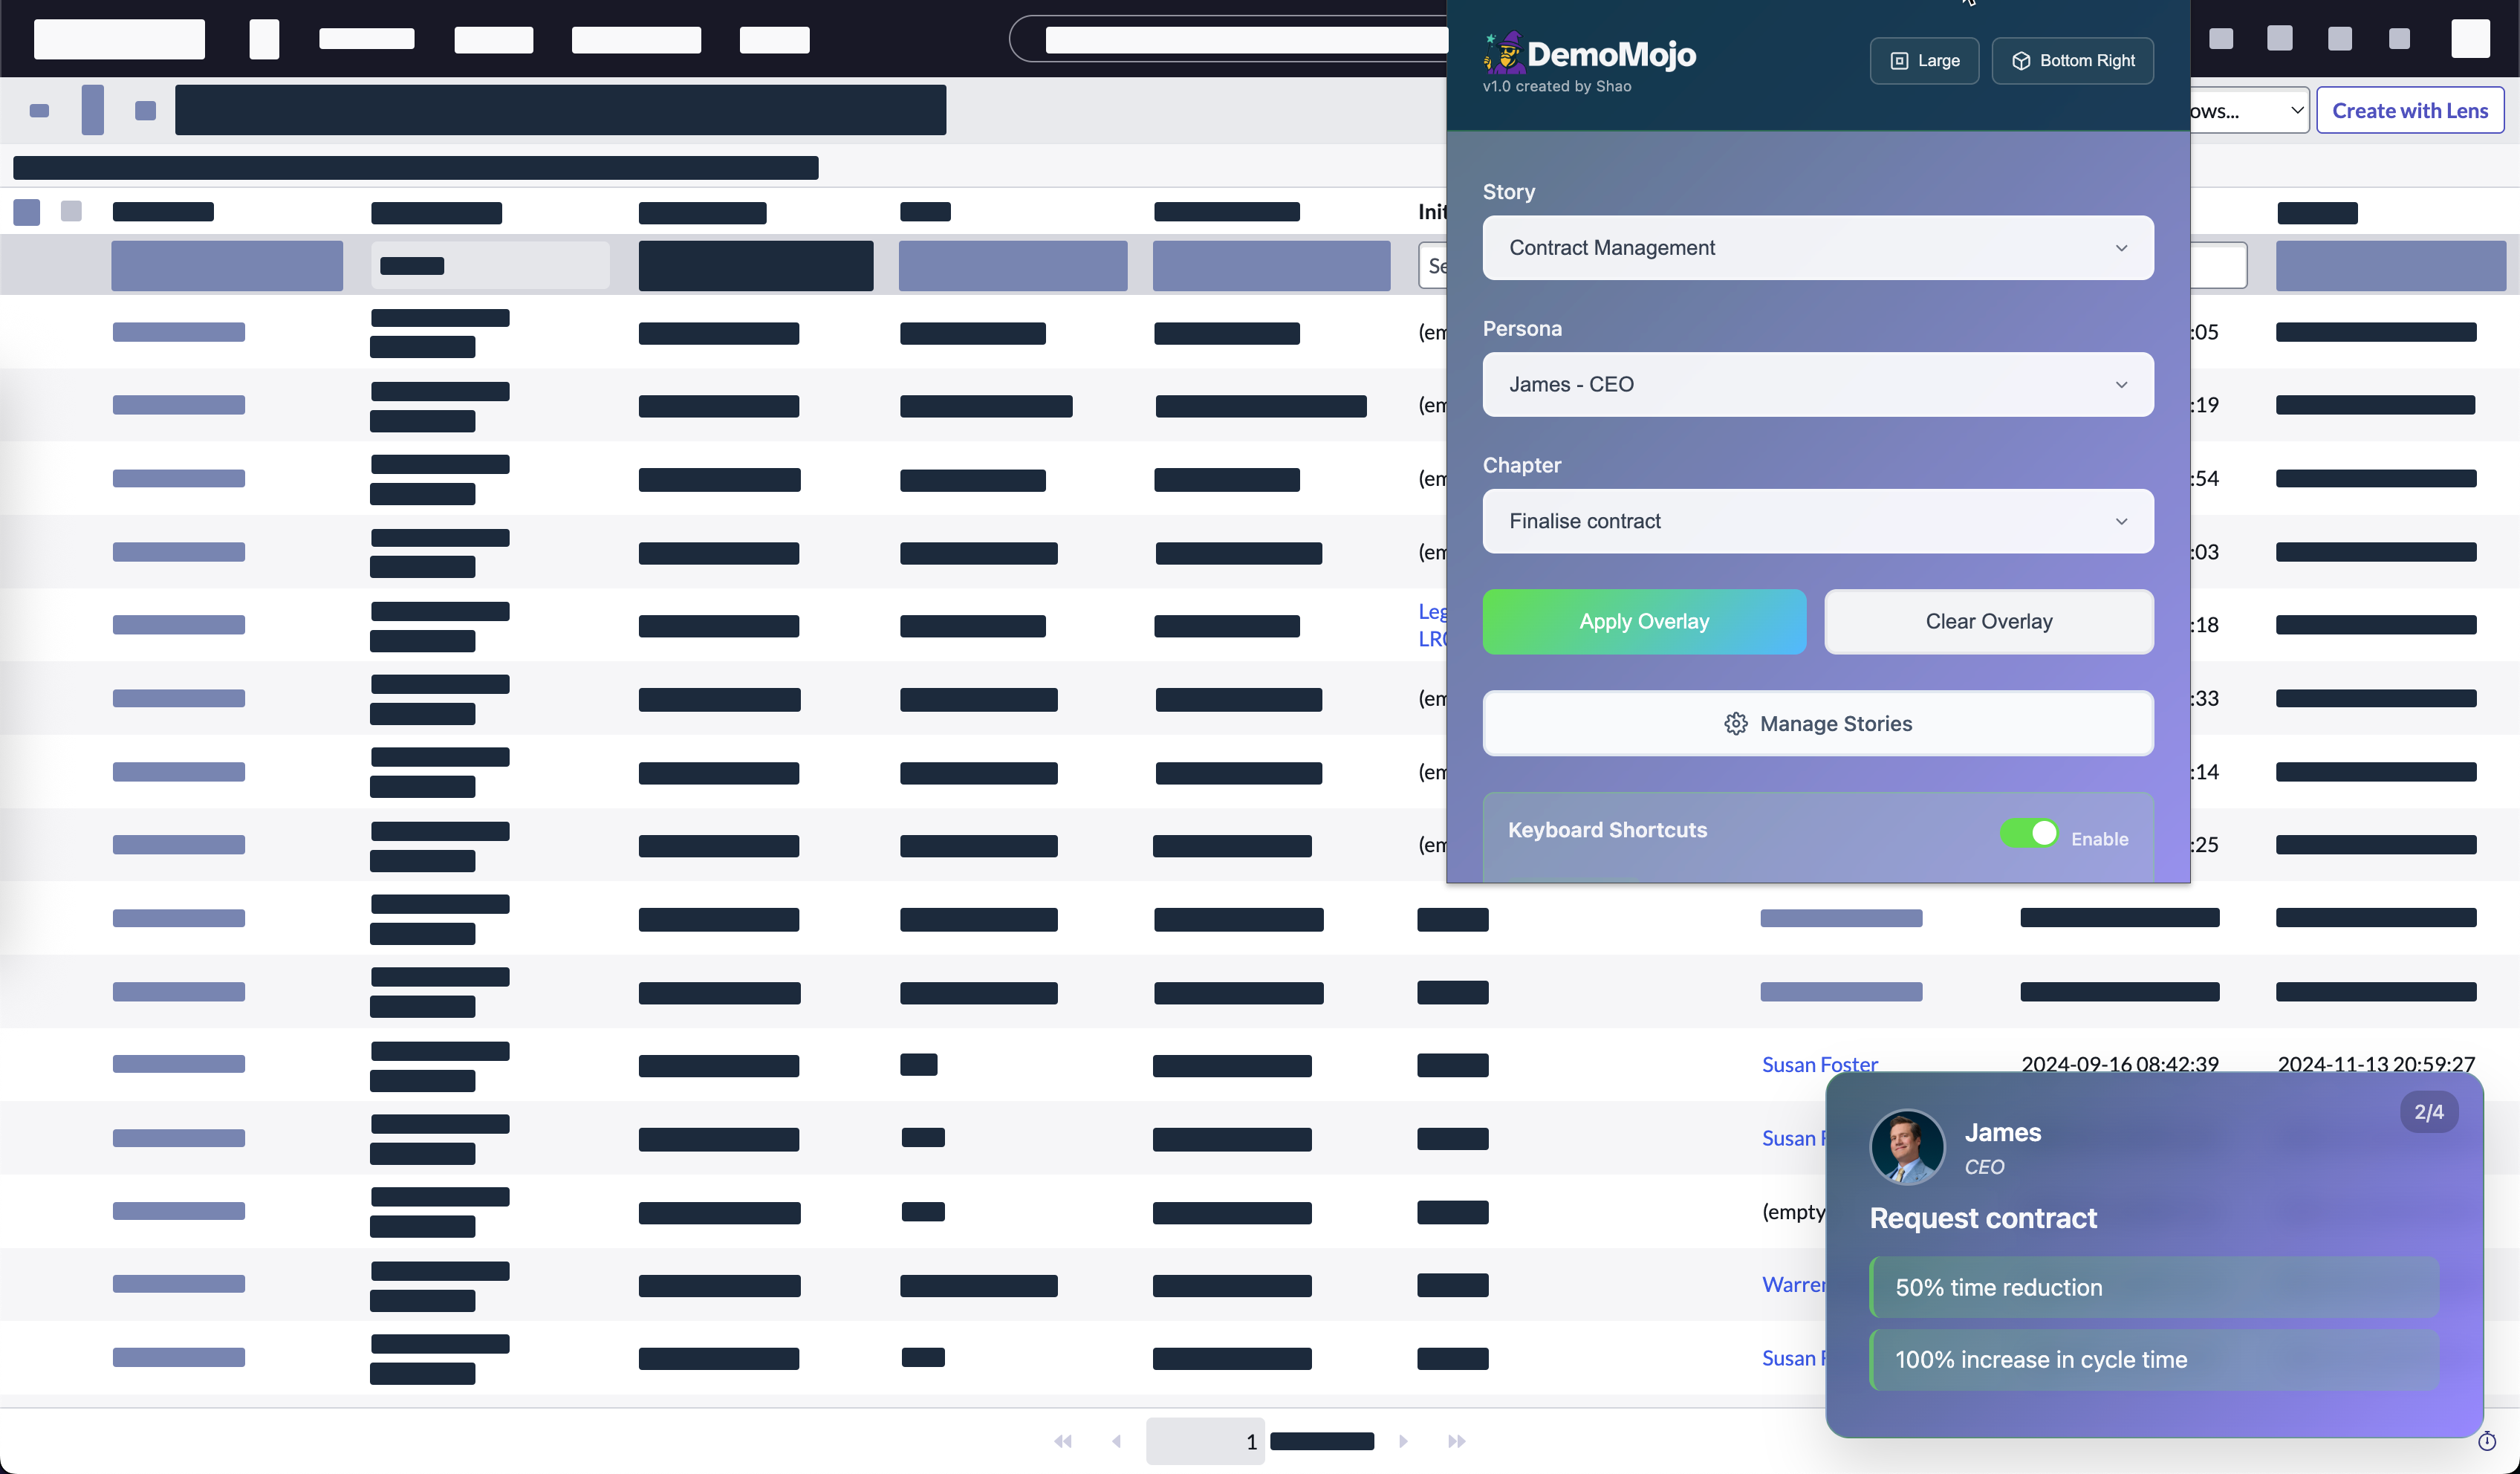
Applying an Overlay
- Select Your Story
Open the DemoMojo popup and choose the story you want to use from the dropdown menu.
- Choose a Persona
Select the persona that best represents your current audience.
- Pick a Chapter
Select the chapter you want to display for the current section of your demo.
- Apply the Overlay
Click "Apply Overlay" to display the overlay on your current page.
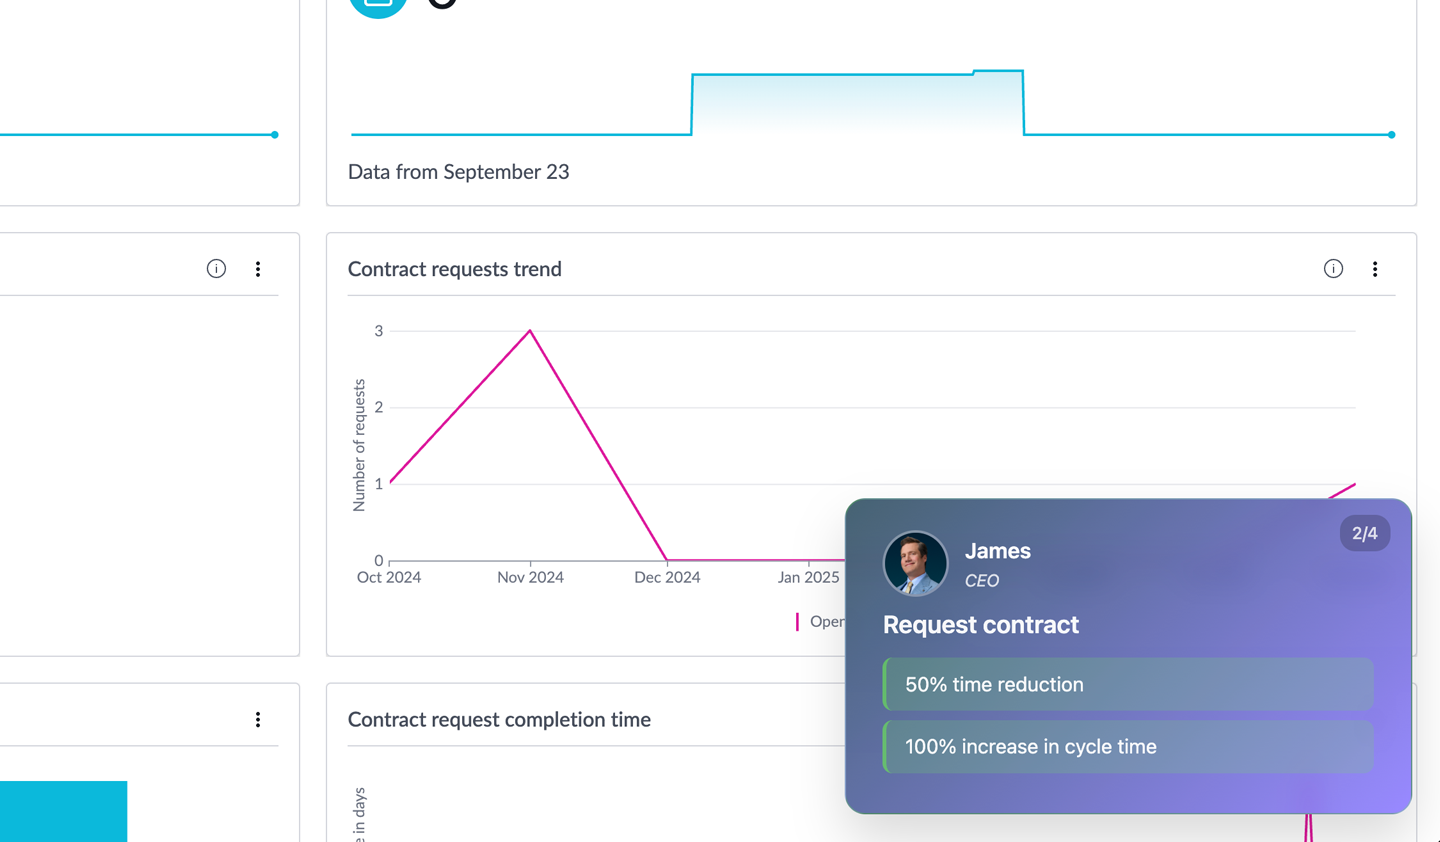
Overlay Display Modes
Small Overlay
Compact floating overlay that provides quick reference without obstructing your main content. Perfect for subtle guidance during demos.
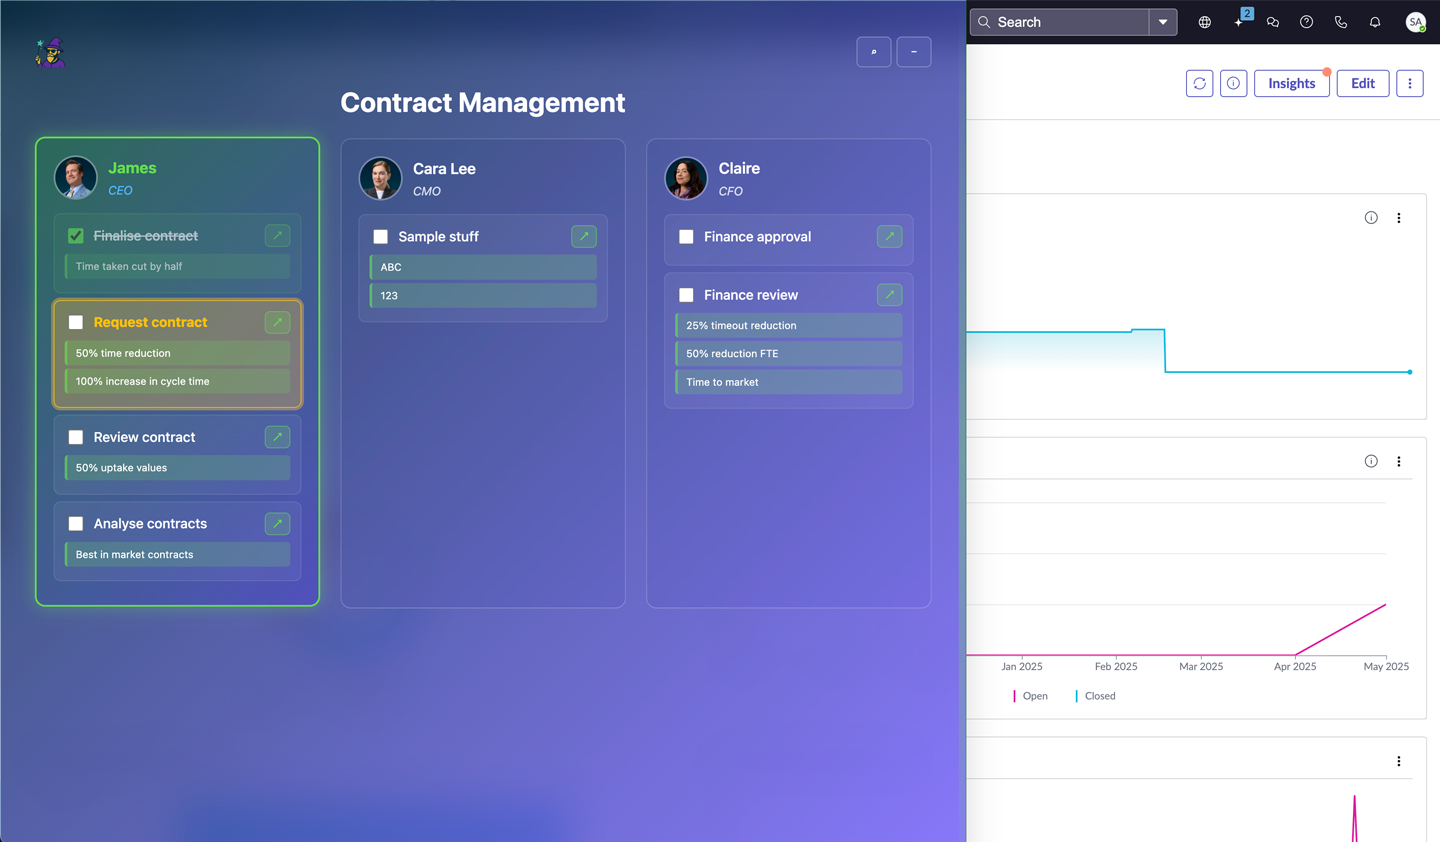
Large Overlay
Full-screen side panel that provides complete story overview with all chapters and value drivers visible. Ideal for comprehensive presentations.
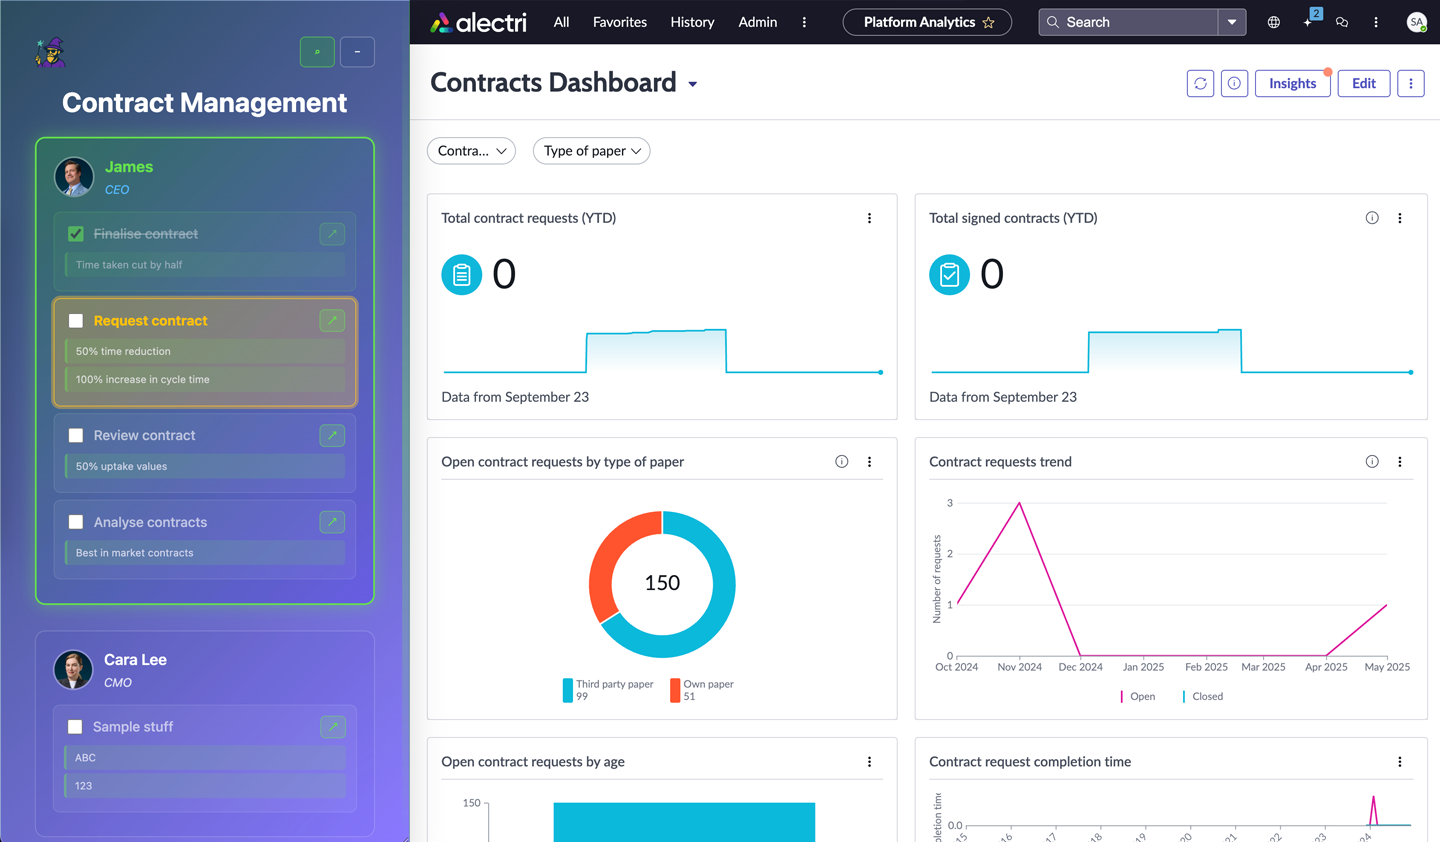
Pinned Content
Pins the overlay to the left of the page and shifts the page content to the right, ensuring optimal viewing experience for both presenter and audience.
Overlay Positioning
DemoMojo offers flexible positioning options to suit your presentation style:
- Bottom Left - Overlay appears in the bottom-left corner
- Bottom Right - Overlay appears in the bottom-right corner (default)
Collapse Persona Chapters
In the fullscreen and pinned content views, you can collapse individual persona cards to show or hide their chapters. This helps you focus on specific personas during your presentation.
- Enable Collapse Feature - Toggle "Collapse Persona Chapters" in Settings to enable this feature
- Collapse Button - Click the collapse icon in the top-left corner of any persona card
- Persistent State - Collapse state is maintained during navigation and page reloads
- Individual Control - Each persona can be independently collapsed or expanded
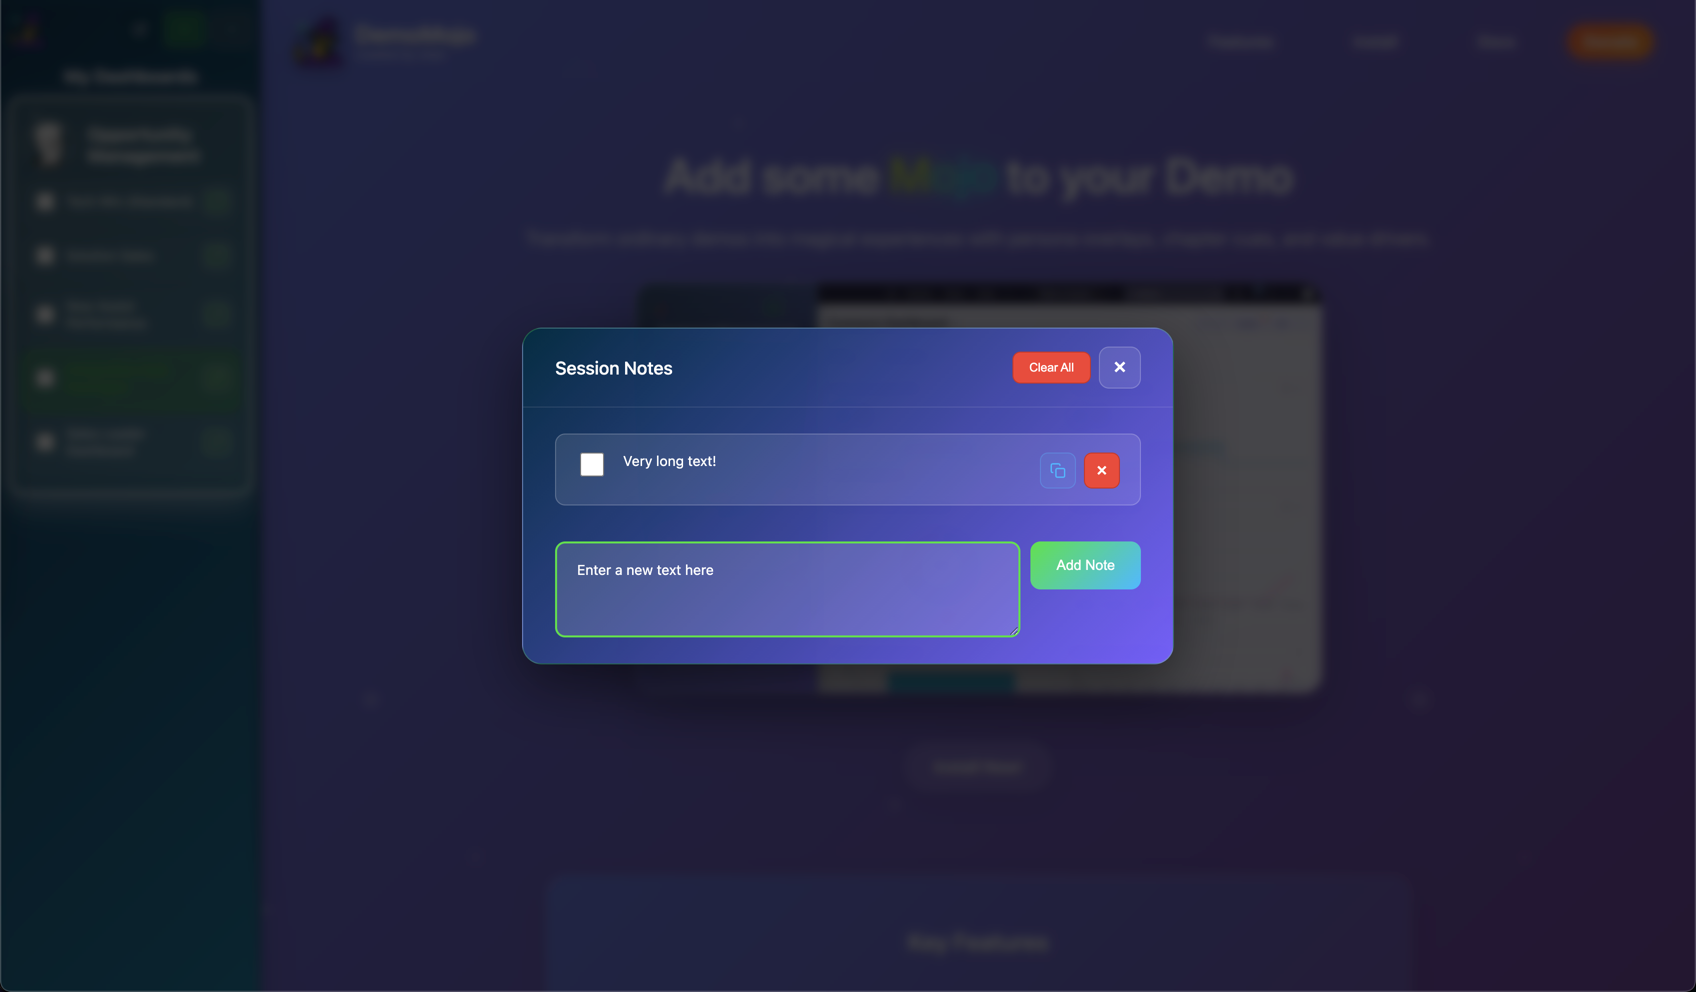
Session Notes
Session Notes allow you to take checkable notes during your demo presentations at the story level. Notes are persistent, saved per story, and help you track important points, reminders, and action items during your demos.
Accessing Session Notes
Session notes can be accessed in two ways:
- From Fullscreen Overlay
When the overlay is in fullscreen mode, click the 📝 button in the top-right corner of the overlay header to open the session notes modal.
- From Setup Page
Session notes are displayed directly in the story management page below each story header. You can view and manage notes without opening the overlay.
Adding Notes
- Open the session notes modal (from fullscreen overlay) or view notes in the setup page
- Type your note in the input field
- Press Enter or click "Add Note"
- The note appears immediately in the list
Managing Notes
- Check/Uncheck Notes - Click the checkbox next to any note to mark it as complete. Checked notes appear with reduced opacity and strikethrough text.
- Delete Individual Notes - Click the × button on any note to remove it permanently
- Clear All Notes - Use the "Clear All" button to delete all notes for a story at once (with confirmation)
- Live Sync - Notes are automatically synced across all open tabs. Changes made in the overlay are immediately visible in the setup page.
Features
- Story-Level Organization - Each story has its own separate notes list
- Persistent Storage - Notes are saved in Chrome storage and persist across browser sessions
- Checkable Items - Mark notes as complete/incomplete during your demo
- Quick Entry - Press Enter to quickly add notes without clicking buttons
- Privacy Protection - Session notes are never exported or imported with stories
- Visual Feedback - Checked notes are visually distinct with strikethrough and reduced opacity
Best Practices
- Use notes to track key talking points during your demo
- Check off items as you complete them to track progress
- Clear notes after each demo session to start fresh
- Review notes in the setup page before starting your next demo
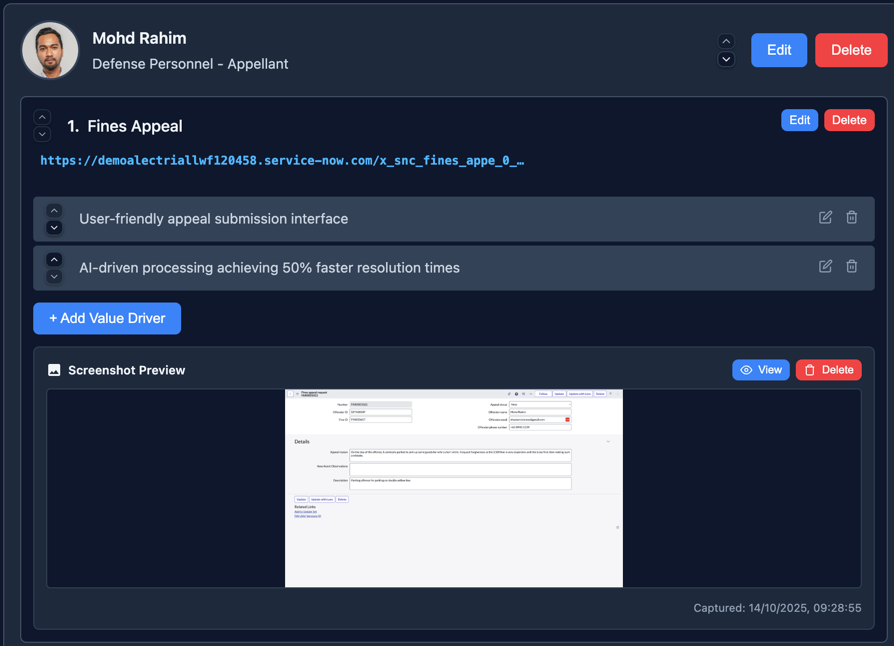
Screen Capture
The Screen Capture feature allows you to take screenshots of the current page and associate them with specific chapters in your demo stories. Screenshots are automatically compressed and can be previewed directly in the setup page.
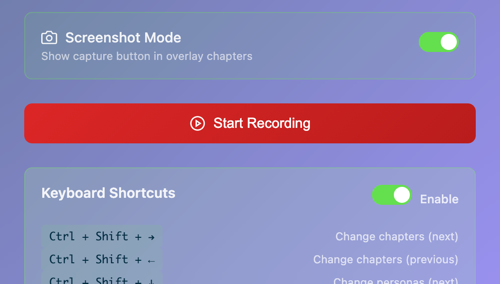
Enabling Screenshot Mode
- Open the DemoMojo popup
- Enable the "Screenshot Mode" toggle (camera icon)
- Select your story, persona, and chapter
- Click "Apply Overlay"
- A purple "Capture Screenshot" button will appear in the overlay
Capturing Screenshots
- Navigate to the page you want to capture
- Ensure the overlay is applied with Screenshot Mode enabled
- Click the "Capture Screenshot" button in the overlay
- The overlay automatically hides during capture to avoid appearing in the screenshot
- A success notification confirms the capture
- The screenshot is automatically saved to the current chapter
Viewing Screenshots
- In Setup Page - Screenshots appear as thumbnails below each chapter with view and delete buttons
- Full-Size View - Click the thumbnail or "View" button to see the full-size screenshot in a modal
- Timestamp Display - Each screenshot shows when it was captured
Managing Screenshots
- Automatic Replacement - New screenshots automatically replace old ones for the same chapter
- Delete Screenshots - Use the delete button in the setup page to remove screenshots
- Compression - Screenshots are automatically compressed to JPEG (80% quality, max 800x600px) for optimal storage
Technical Details
- Format - JPEG format for better compression
- Quality - 80% quality balance between file size and image quality
- Max Dimensions - 800x600 pixels (maintains aspect ratio)
- Storage - Screenshots are stored in Chrome local storage with story data
- PowerPoint Integration - Screenshots are automatically included when exporting stories to PowerPoint
Screen Recording
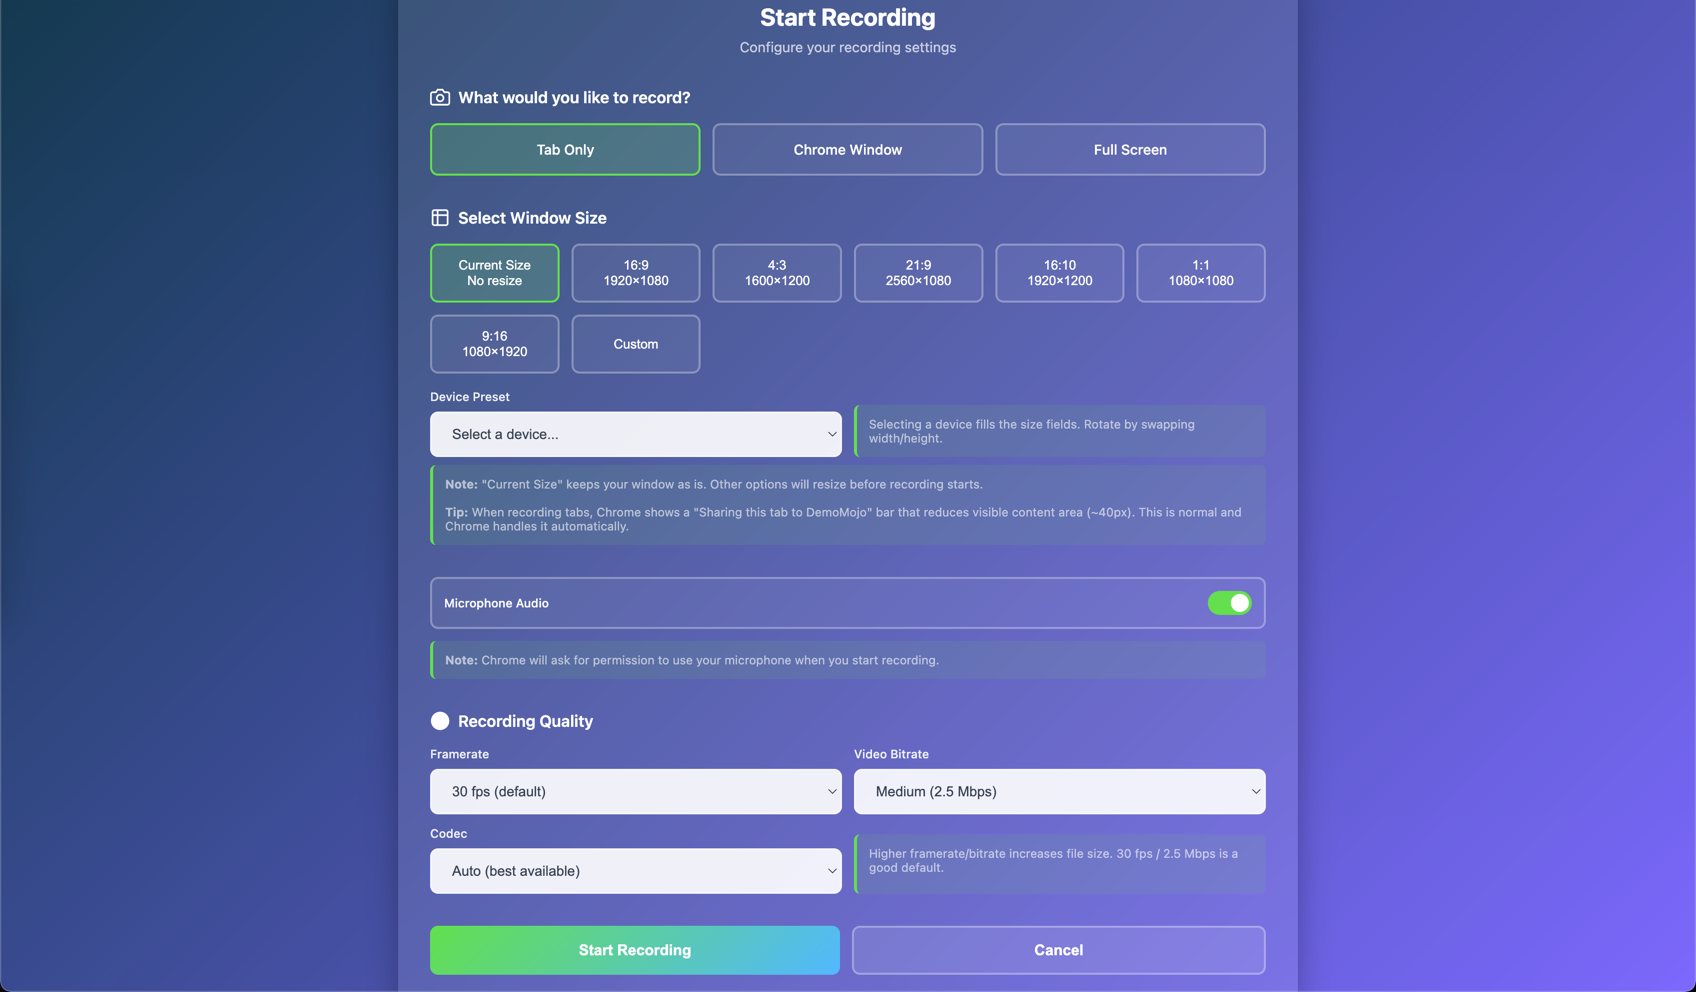
DemoMojo includes a powerful standalone screen recording feature that allows you to record your screen, Chrome window, or individual tabs. Recordings can be customized with various quality settings, audio options, and window sizes.
Starting a Recording
- Click "Start Recording" in the DemoMojo popup
- The recording setup page opens where you can configure your recording
- Select your capture type, window size, audio, and quality options
- Click "Start Recording" to begin
Capture Types
- Tab Only - Records just the active tab content (no browser UI). Perfect for clean demo recordings.
- Chrome Window - Records the entire Chrome window including browser UI, omnibox, toolbars, and overlays.
- Full Screen - Records the entire desktop screen (all monitors, all windows).
Window Sizing Options
For Tab and Chrome Window capture, you can choose from:
- Current Size - Keeps window as-is, no resize
- Preset Aspect Ratios - 16:9, 4:3, 21:9, 16:10, 1:1, 9:16
- Device Presets - iPhone 15 Pro, iPhone SE, Pixel 7, Galaxy S23, iPad Pro, Surface Duo, and more
- Custom Dimensions - Specify exact width and height (320-3840 width, 240-2160 height)
Audio Options
- Microphone Audio - Toggle to enable/disable microphone recording (enabled by default)
- Chrome will prompt for microphone permission if needed
- Recording gracefully falls back if permission is denied
Quality Options
- Framerate - Choose from 15, 24, 30 (default), or 60 fps
- Video Bitrate - 1.5 Mbps (low), 2.5 Mbps (medium/default), 5 Mbps (high), or 8 Mbps (very high)
- Codec - Auto (default), VP8, or VP9
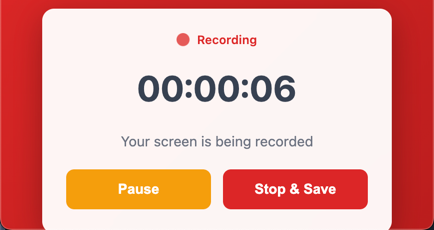
Recording Controls
During recording, a control window appears with:
- Timer - Displays elapsed time in HH:MM:SS format
- Pause/Resume - Pause recording and timer, then resume from where you left off
- Stop & Save - Stops recording and downloads the video as a .webm file
- Status Indicator - Visual indicator shows recording (pulsing red dot) or paused (static orange dot) state
Downloading Recordings
- Videos are automatically downloaded when you click "Stop & Save"
- Filename format: `demomoj-recording-[timestamp].webm`
- Recording window auto-closes after download
- Videos are saved in WebM format for wide compatibility
Best Practices
- Use "Tab Only" for clean demo recordings without browser UI
- Select device presets when recording mobile app demos
- Enable microphone for voice-over narration
- Use 30 fps for standard recordings, 60 fps for high-quality demos
- Pause recording when you need to take breaks or prepare next steps
- Test your audio setup before starting important recordings
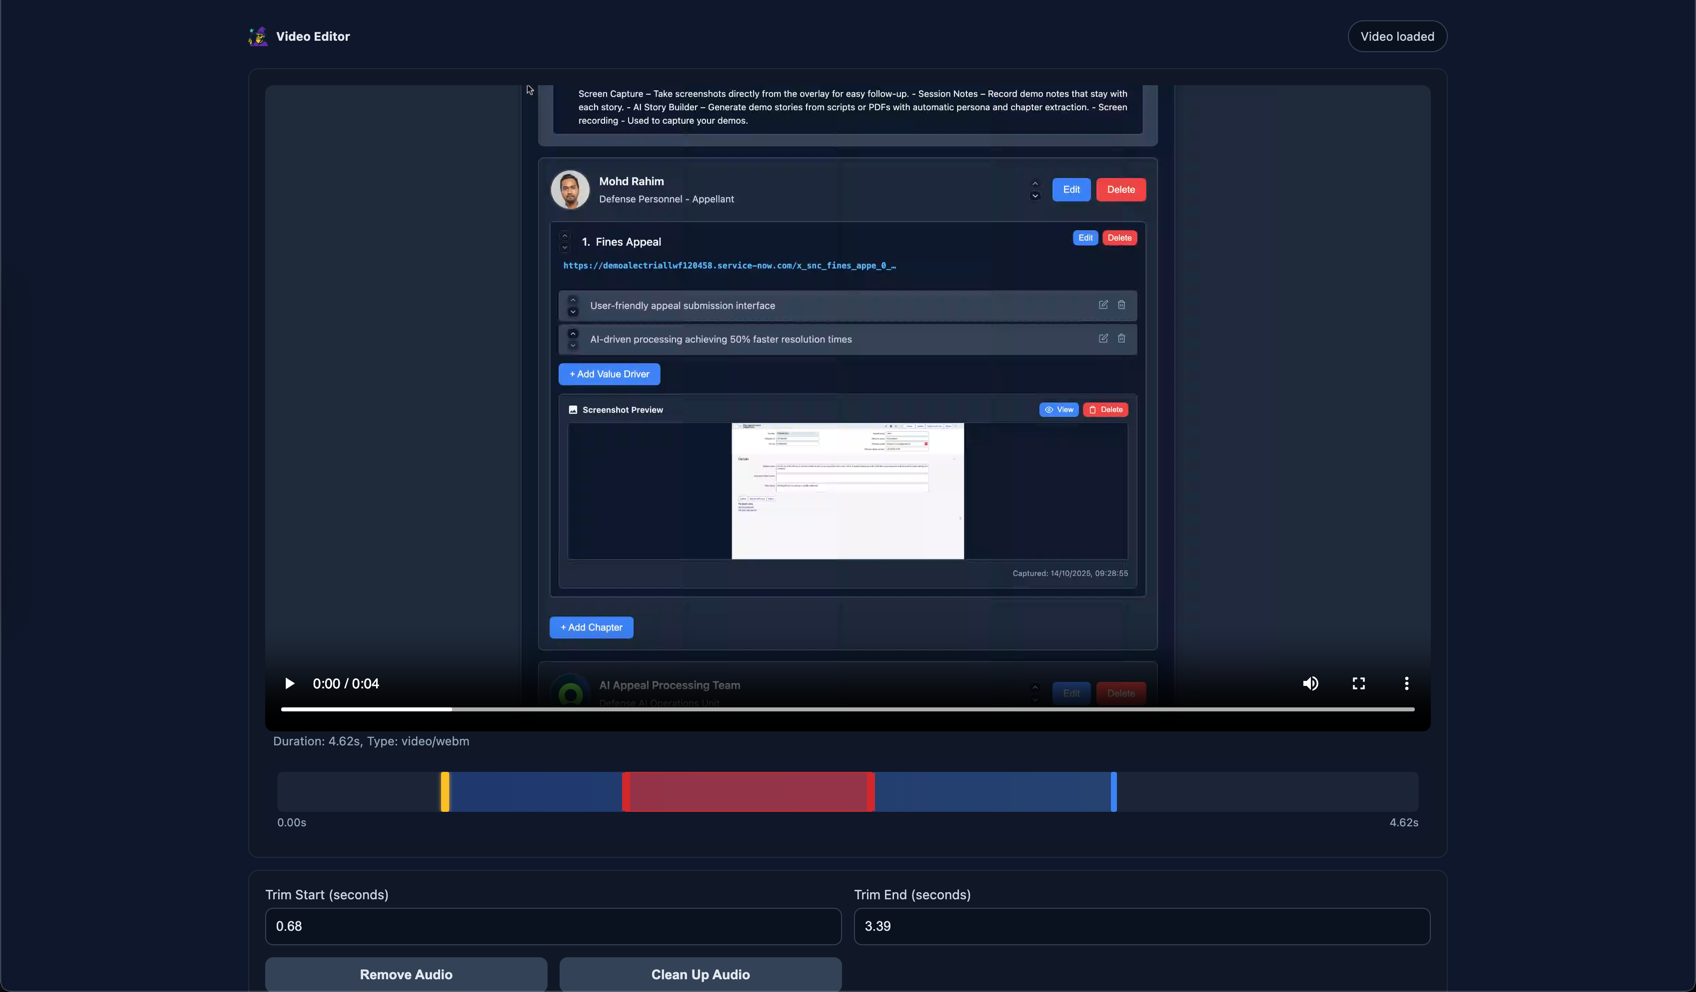
Video Editor
After recording your screen, DemoMojo's built-in video editor allows you to trim, cut segments, adjust audio, and export your edited video. The editor provides professional editing capabilities directly in your browser.
Opening the Video Editor
The video editor automatically opens after you stop a recording, or you can access it from the recording controls window.
Editing Features
- Trim Video - Set start and end points to trim unwanted portions
- Cut Segments - Remove specific segments from the middle of your video
- Audio Controls - Remove audio or apply audio denoising
- Quality Settings - Adjust export quality for file size optimization
- Visual Timeline - See your video timeline with trim points and cut segments marked
Export Options
- Export Full Video - Export the complete original recording without any edits
- Export Edited Video - Export with all your edits applied (trims, cuts, audio changes)
- Progress Tracking - Real-time progress bar during export
- File Format - Exports as WebM format for wide compatibility
Workflow
- Record your screen using the Screen Recording feature
- Video editor opens automatically
- Set trim points to remove beginning/end portions
- Add cut segments to remove unwanted middle sections
- Adjust audio settings (remove or denoise)
- Preview your edits
- Export the edited video
Tips
- Use trim points to remove setup time at the beginning and cleanup at the end
- Cut segments are useful for removing mistakes or pauses
- Audio denoising can improve voice clarity in recordings
- Lower quality settings reduce file size for easier sharing
- Always export edited videos before closing the editor
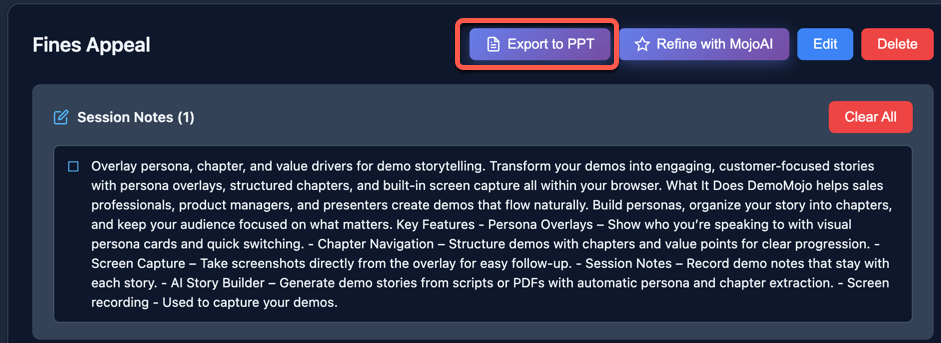
PowerPoint Export
Export your complete demo stories to professional PowerPoint presentations (.pptx files). PowerPoint exports include all personas, chapters, value drivers, and screenshots with theme integration.
Exporting to PowerPoint
- Open the story management page (Setup)
- Find the story you want to export
- Click the "Export to PPT" button in the story actions
- Wait for the PowerPoint generation to complete
- The .pptx file will automatically download
What's Included
- Title Slide - Story name with "Created with DemoMojo" branding
- Overview Slide - Hierarchical listing of all personas and their chapters
- Persona Introduction Slides - Individual slides for each persona with headshots and business titles
- Chapter Detail Slides - Comprehensive slides for each chapter including:
- Chapter title and description
- All value drivers
- Screenshots (if captured) with proper proportional scaling
Theme Integration
PowerPoint colors automatically follow your extension theme settings:
- Default Theme - Uses the default DemoMojo color scheme
- Predefined Themes - Purple, Orange, or Dark themes are applied
- Custom Themes - Your custom color themes are automatically used
Professional Layout
- Clean, centered slide designs
- Proper spacing and typography
- Screenshots maintain original aspect ratio
- Text boxes sized to prevent overflow
- Consistent styling throughout the presentation
Best Practices
- Capture screenshots for chapters before exporting for best results
- Review your story content in the setup page before exporting
- Customize your theme colors in Settings to match your brand
- Use the exported PowerPoint as a backup or for offline presentations
- Share PowerPoint files with team members who don't have the extension
File Naming
PowerPoint files are automatically named using the story name, with special characters sanitized for file system compatibility.
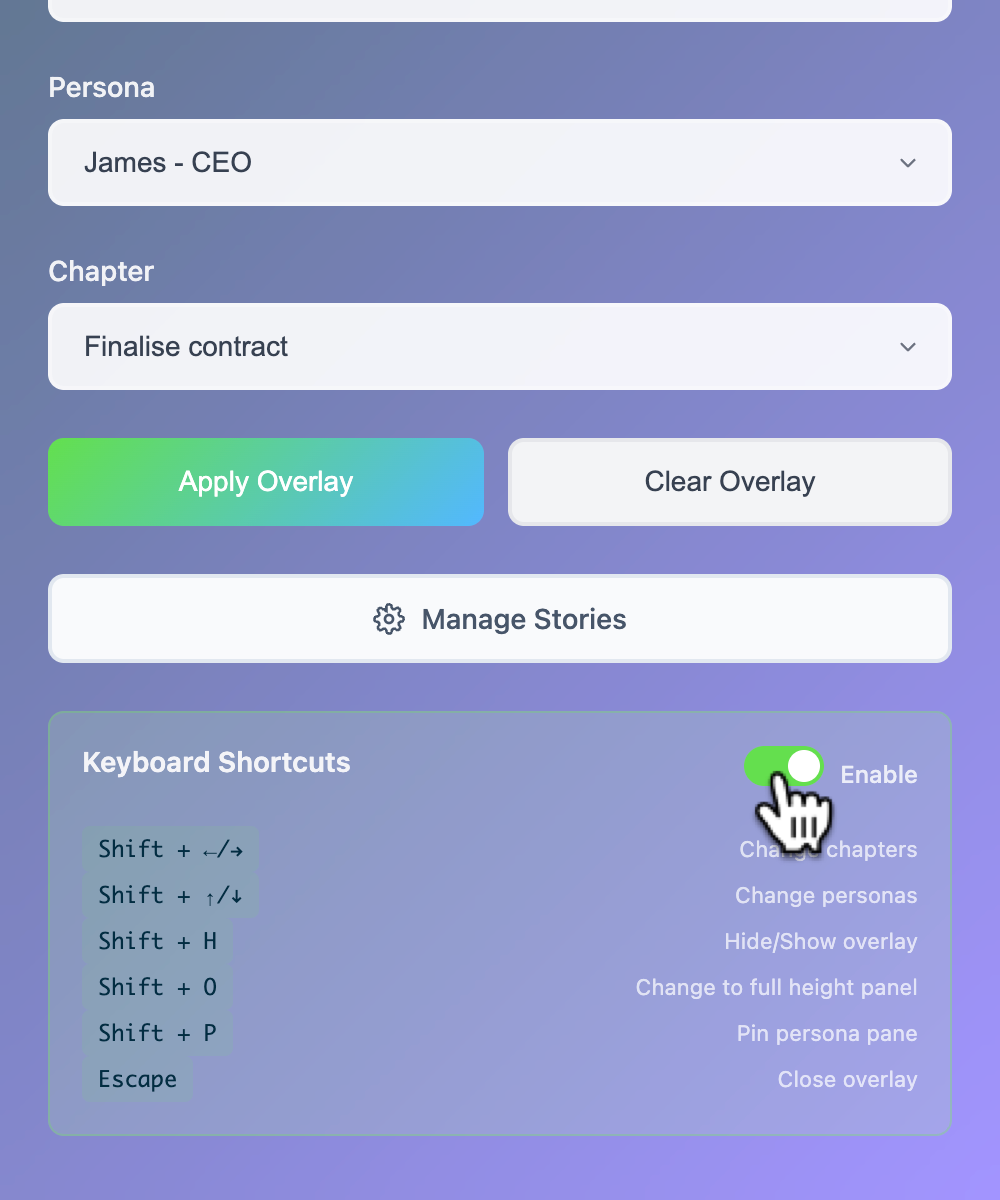
Keyboard Shortcuts
DemoMojo provides powerful keyboard shortcuts for quick navigation and control during your presentations. All shortcuts can be customized in the Settings page, and shortcuts can be enabled or disabled in the extension popup.
Navigation Shortcuts
Ctrl + Shift + ←
Previous chapter
Ctrl + Shift + →
Next chapter
Ctrl + Shift + ↑
Previous persona
Ctrl + Shift + ↓
Next persona
Display Control Shortcuts
Ctrl + Shift + H
Hide/Show overlay
Ctrl + Shift + O
Toggle fullscreen mode
Ctrl + Shift + P
Pin persona pane
Escape
Close overlay
URL Management Shortcuts
Ctrl + Shift + S
Save current page URL to active chapter
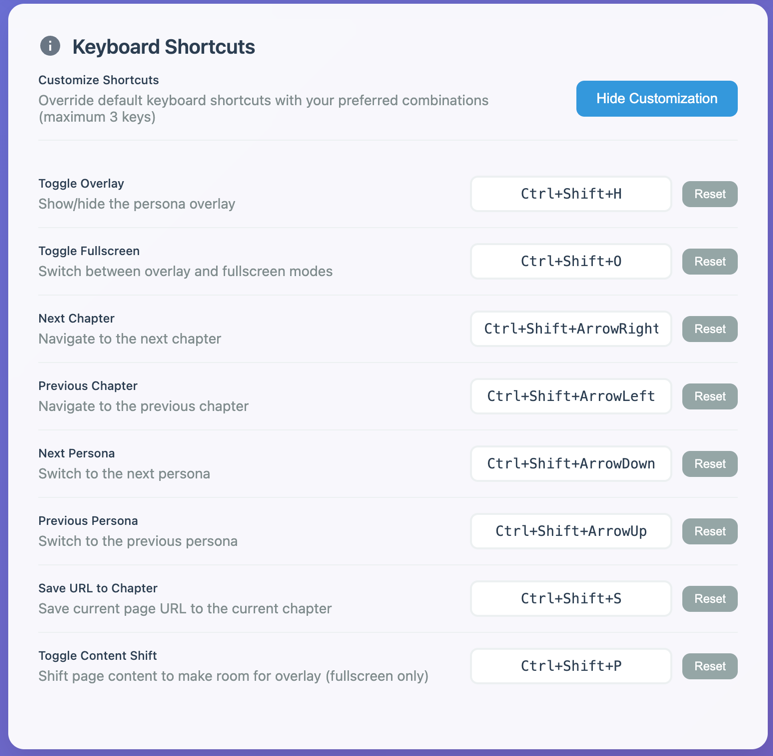
Customizing Shortcuts
All keyboard shortcuts can be customized in the Settings page. You can create up to 3-key combinations and override the default shortcuts to match your preferences.
How to Customize Shortcuts:
- Go to Settings from the extension popup or setup page
- Click "Customize" in the Keyboard Shortcuts section
- Click on any shortcut input field to start recording
- Press your desired key combination (up to 3 keys)
- Click "Save Shortcuts" to apply changes
Enabling/Disabling Shortcuts
You can toggle keyboard shortcuts on or off using the switch in the DemoMojo popup. When disabled, you can still use the overlay buttons for navigation.
URL Management & Auto-Highlight
DemoMojo allows you to save URLs to chapters and automatically highlights relevant content when you visit those pages. This powerful feature creates seamless integration between your demo stories and the actual applications or websites you're demonstrating.
How to Save URLs to Chapters
- Using Keyboard Shortcut: Press
Ctrl + Shift + S while on any webpage to save the current page URL to your active chapter
- In Setup Interface: Double-click on any chapter's URL field in the story management interface to add or edit URLs
- Automatic URL Formatting: DemoMojo automatically adds "https://" prefix if you don't include a protocol
- Visual Indicators: Chapters with saved URLs show the URL text, while chapters without URLs display a placeholder "No URL set (double-click to add)"
Auto-Highlight Feature
When you visit a page that matches a saved chapter URL, DemoMojo automatically highlights that chapter in the overlay:
- Automatic Detection: Works with both exact URL matches and partial matches (when the current URL contains the saved URL)
- Real-time Updates: Automatically detects URL changes in single-page applications (SPAs) and updates highlighting accordingly
- Cross-Tab Sync: URL-based highlighting works across browser tabs and persists your location
- Smart Navigation: Automatically switches to the matching chapter when you navigate to a saved URL
URL Navigation
- Click to Navigate: Click on any saved URL in the overlay to open that page in a new tab
- Context Awareness: URLs are contextually linked to their respective chapters and personas
- Keyboard Shortcut: Use
Ctrl + Shift + S to quickly save the current page URL to your active chapter
Best Practices for URL Management
- Use Full URLs: Include the complete URL including the domain for best matching results
- Keep URLs Updated: If page URLs change, update them in the setup interface to maintain auto-highlight functionality
- Organize by Persona: Save URLs to the most relevant persona's chapters for better organization
- Test Auto-Highlight: After saving URLs, navigate to those pages to verify the auto-highlight feature works correctly
- Use for Demos: Save URLs for each step of your demo flow to create seamless transitions between your story and the actual application
Auto-Highlight Settings
You can enable or disable the auto-highlight feature in the Settings page:
- Enable Auto-Highlight: Automatically highlight chapters when visiting saved URLs
- Disable Auto-Highlight: Turn off automatic chapter highlighting (URLs are still saved and clickable)
Settings & Customization
DemoMojo offers comprehensive customization options through its Settings page. Access settings via the settings button in the extension popup or directly from the setup page.
Overlay Settings
- Default Size - Choose small or large overlay as default
- Default Position - Set bottom-right, bottom-left, full-screen, or pinned content
- Keyboard Shortcuts - Enable/disable and customize all shortcuts
Appearance Settings
- Overlay Opacity - Control background transparency (10-100%)
- Color Scheme - Choose from default, purple, orange, or dark themes
Behavior Settings
- Auto-highlight Chapter - Automatically highlight chapters when page URL matches
- Progress Indicators - Show chapter completion status (e.g., 2/5)
- Cross-Tab Sync - Synchronize chapter completion and highlighting across browser tabs
Data Management
- Export Data - Download backup of all stories and settings
- Import Data - Restore from backup file
- Reset Data - Clear all data and start fresh
MojoAI Settings
- OpenAI API Key - Configure API access for AI features
- AI Model Selection - Choose GPT-3.5 Turbo, GPT-4, or GPT-4 Turbo
- Max Tokens - Control response length and detail
- PDF File Size Limit - Configure maximum upload size (100-10000 KB)
- Default Guidelines - Set default instructions for all story generations
Display Preferences
- Collapse Persona Chapters - Enable/disable collapse button functionality in side panel view
- Minimal Padding Mode - Reduce overlay width in pinned content view (25% smaller)
Export/Import
- Export Data - Download complete backup of all stories, settings, and custom themes
- Import Data - Restore from backup file (includes version checking)
- Export Custom Theme - Export individual custom color themes
- Import Custom Theme - Import custom color themes from files
- Reset Data - Clear all data and start fresh
Advanced Settings
- URL-Based Overlay Limiting - Limit overlays to tabs with the same parent URL (enabled by default)
- Cross-Tab Sync - Synchronize chapter completion and highlighting across browser tabs
- Floating Save Button - Save button appears only when changes are detected
- Change Detection - Real-time monitoring of all settings changes
Troubleshooting
Here are solutions to common issues you might encounter while using DemoMojo:
Overlay Not Appearing
- Ensure you've selected a story, persona, and chapter before clicking "Apply Overlay"
- Check that the overlay isn't hidden using Ctrl + Shift + H
- Try refreshing the page and reapplying the overlay
- Verify that the extension is enabled in Chrome's extension settings
Keyboard Shortcuts Not Working
- Make sure keyboard shortcuts are enabled in the DemoMojo popup
- Ensure the webpage has focus (click on the page content)
- Check that no other extensions are conflicting with DemoMojo shortcuts
- Try refreshing the page and reapplying the overlay
Images Not Loading
- Verify that persona headshot images are properly uploaded
- Check that image files are in supported formats (PNG, JPG, GIF)
- Ensure image files are not corrupted or too large
- Try re-uploading the images in the story management page
Performance Issues
- Close unnecessary browser tabs to free up memory
- Disable other extensions that might be conflicting
- Try using the small overlay mode instead of large overlay
- Restart Chrome if the extension becomes unresponsive
Getting Help
If you continue to experience issues:
- Check the Chrome extension console for error messages
- Try reinstalling the extension
- Contact support with specific details about your issue
- Check for updates to the DemoMojo extension